
Flutter 앱에 1:1 음성 통화를 얹기까지 — WebRTC, CallKit, 그리고 삽질의 기록
서비스 앱에 사용자 간 1:1 음성 통화 기능을 넣게 되었다. “그냥 WebRTC 붙이면 되는 거 아니야?” 하고 시작했다가, iOS PushKit의 절대적인 규칙, Android Cold Start의 타이밍 지옥, Socket.IO의 미묘한 연결 순서 문제, 그리고 예상치 못한 레이스 컨디션들을 하나씩 뚫어 나간 이야기다.
1장. “전화가 와야 하는데, 앱이 죽어있어요”
프로젝트의 요구사항은 단순했다. 사용자 A가 사용자 B에게 전화를 걸면, B의 폰에 전화 화면이 뜨고, 수락하면 음성 통화가 연결되는 것. 카카오톡 음성통화처럼.
문제는 “B의 폰에 전화 화면이 뜨고”라는 한 문장에 숨어있었다. B가 앱을 열어놓고 있으면 간단하다. FCM 푸시를 받아서 UI를 띄우면 된다. 하지만 앱이 꺼져있을 때는? 심지어 폰이 잠금 상태일 때는?
iOS와 Android가 각각 완전히 다른 방식으로 이걸 처리한다는 걸 알게 되면서, “그냥 WebRTC 붙이면 된다”는 환상이 깨졌다.
iOS: Apple이 정한 절대 규칙
iOS에서 앱이 죽어있는 상태에서 전화 알림을 띄우려면 PushKit VoIP 푸시를 써야 한다. 일반 APNs 푸시로는 전화 화면을 띄울 수 없다. 그리고 Apple은 PushKit 푸시를 받으면 반드시 CallKit UI를 표시하도록 강제한다. 표시하지 않으면 앱이 크래시된다. 선택권이 없다.
Android: 자유롭지만 그래서 더 복잡한
Android는 FCM 데이터 메시지를 받아서 전체화면 알림을 직접 띄워야 한다. flutter_callkit_incoming 패키지가 이 역할을 해주지만, 문제는 FCM background handler가 별도의 Dart Isolate에서 실행된다는 것이다. 메인 Flutter 엔진과는 완전히 분리된 세계다. 여기서 보낸 이벤트가 메인 엔진에 도달할 거라는 보장이 없다.
이 두 플랫폼의 극명한 차이가, 결국 아키텍처 전체를 결정지었다.
2장. 아키텍처: “네이티브가 주인, Flutter는 손님”
고민 끝에 내린 결론은 “네이티브 퍼스트” 아키텍처였다. Socket.IO 시그널링과 CallKit 비즈니스 로직은 모두 네이티브(Kotlin/Swift)에서 처리하고, Flutter는 WebRTC 미디어 관리와 UI 상태 전이만 담당한다.
이렇게 한 이유는:
- iOS PushKit 콜백은 네이티브에서만 받을 수 있다
- CallKit의
CXAnswerCallAction은 네이티브 레벨에서 즉시 응답해야 한다 (늦으면 시스템이 통화를 끊어버린다) - Android에서도 FCM background handler가 네이티브에 더 가깝다
- Flutter 엔진이 아직 준비되지 않았을 때도 통화 로직이 동작해야 한다
전체 구조를 계층별로 그리면 이렇다:
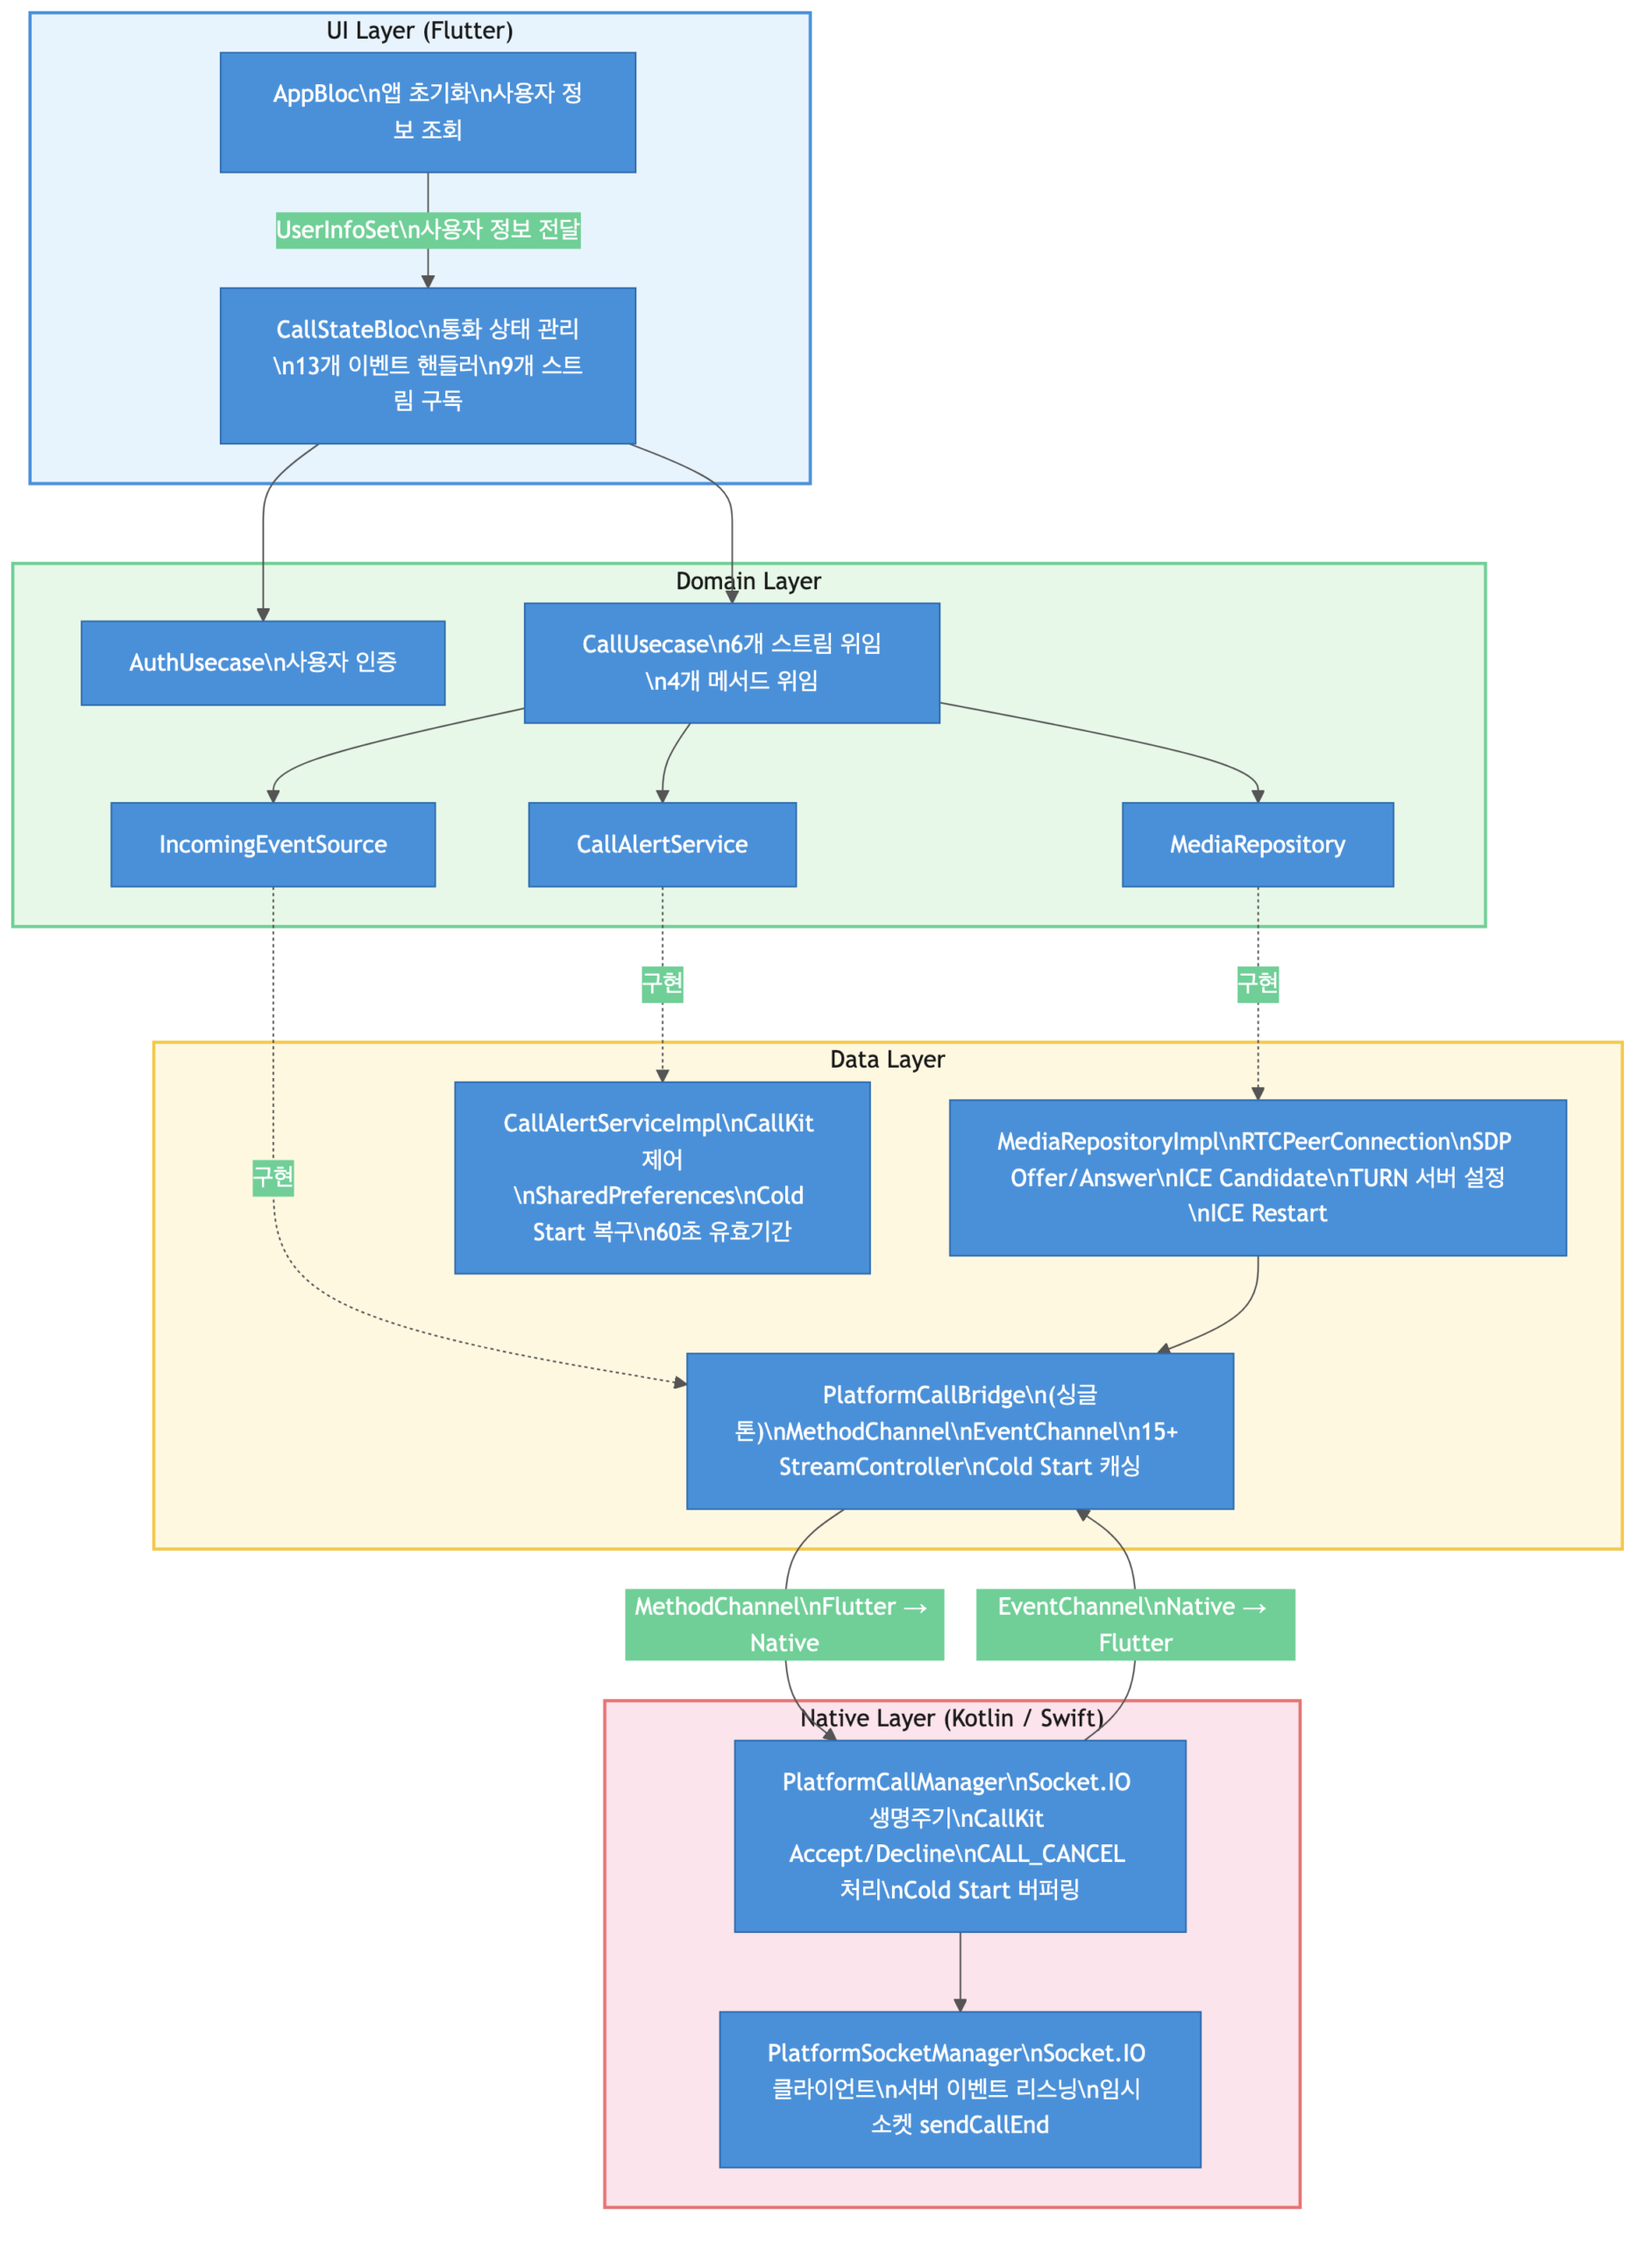
PlatformCallBridge가 핵심 허브 역할을 한다. 4개의 인터페이스(SocketClient, SocketEventSource, SignalingDataSource, IncomingEventSource)를 동시에 구현하는 싱글톤으로, 하나의 EventChannel에서 들어오는 12가지 이상의 이벤트를 type 필드 기준으로 분류하여 적절한 StreamController로 라우팅한다.
void _handleNativeEvent(dynamic event) {
  if (event is! Map) return;
  final type = event["type"] as String?;
  final data = event["data"];

  switch (type) {
    // Socket 이벤트
    case "connectionReady":
      _connectionReadyController.add(null);
    case "signal":
      _signalController.add(data);
    case "peerWaiting":
      _peerWaitingController.add(null);
    case "peerBusy":
      _peerBusyController.add(null);
    case "callTerminated":
      _callTerminatedController.add(null);
    case "peerOffline":
      _peerOfflineController.add(null);
    case "pushDeliveryFailed":
      _pushDeliveryFailedController.add(null);
    case "relayConfig":
      _relayConfigController.add(data);

    // CallKit 이벤트 (네이티브에서 비즈니스 로직 처리 완료, UI 업데이트만)
    case "userAccepted":
      final mapData = Map<String, dynamic>.from(data as Map);
      _pendingAcceptEvent = mapData;  // Cold Start 복구용 캐시
      _acceptedController.add(mapData);
    case "userDeclined":
      _declinedController.add(Map<String, dynamic>.from(data as Map));
    case "userHangup":
      _hangupController.add(Map<String, dynamic>.from(data as Map));
    case "callCancelled":
      _cancelledController.add(null);

    // FCM 포그라운드 착신
    case "incomingCall":
      _incomingCallController.add(IncomingCallInfo(
        callerName: data["callerName"]?.toString() ?? "",
        callerOrg: data["callerOrg"]?.toString() ?? "",
        callerId: data["callerId"]?.toString() ?? "",
      ));
  }
}
3장. WebRTC 연결 — 보이지 않는 함정들
발신 통화의 전체 시퀀스는 다음과 같다:
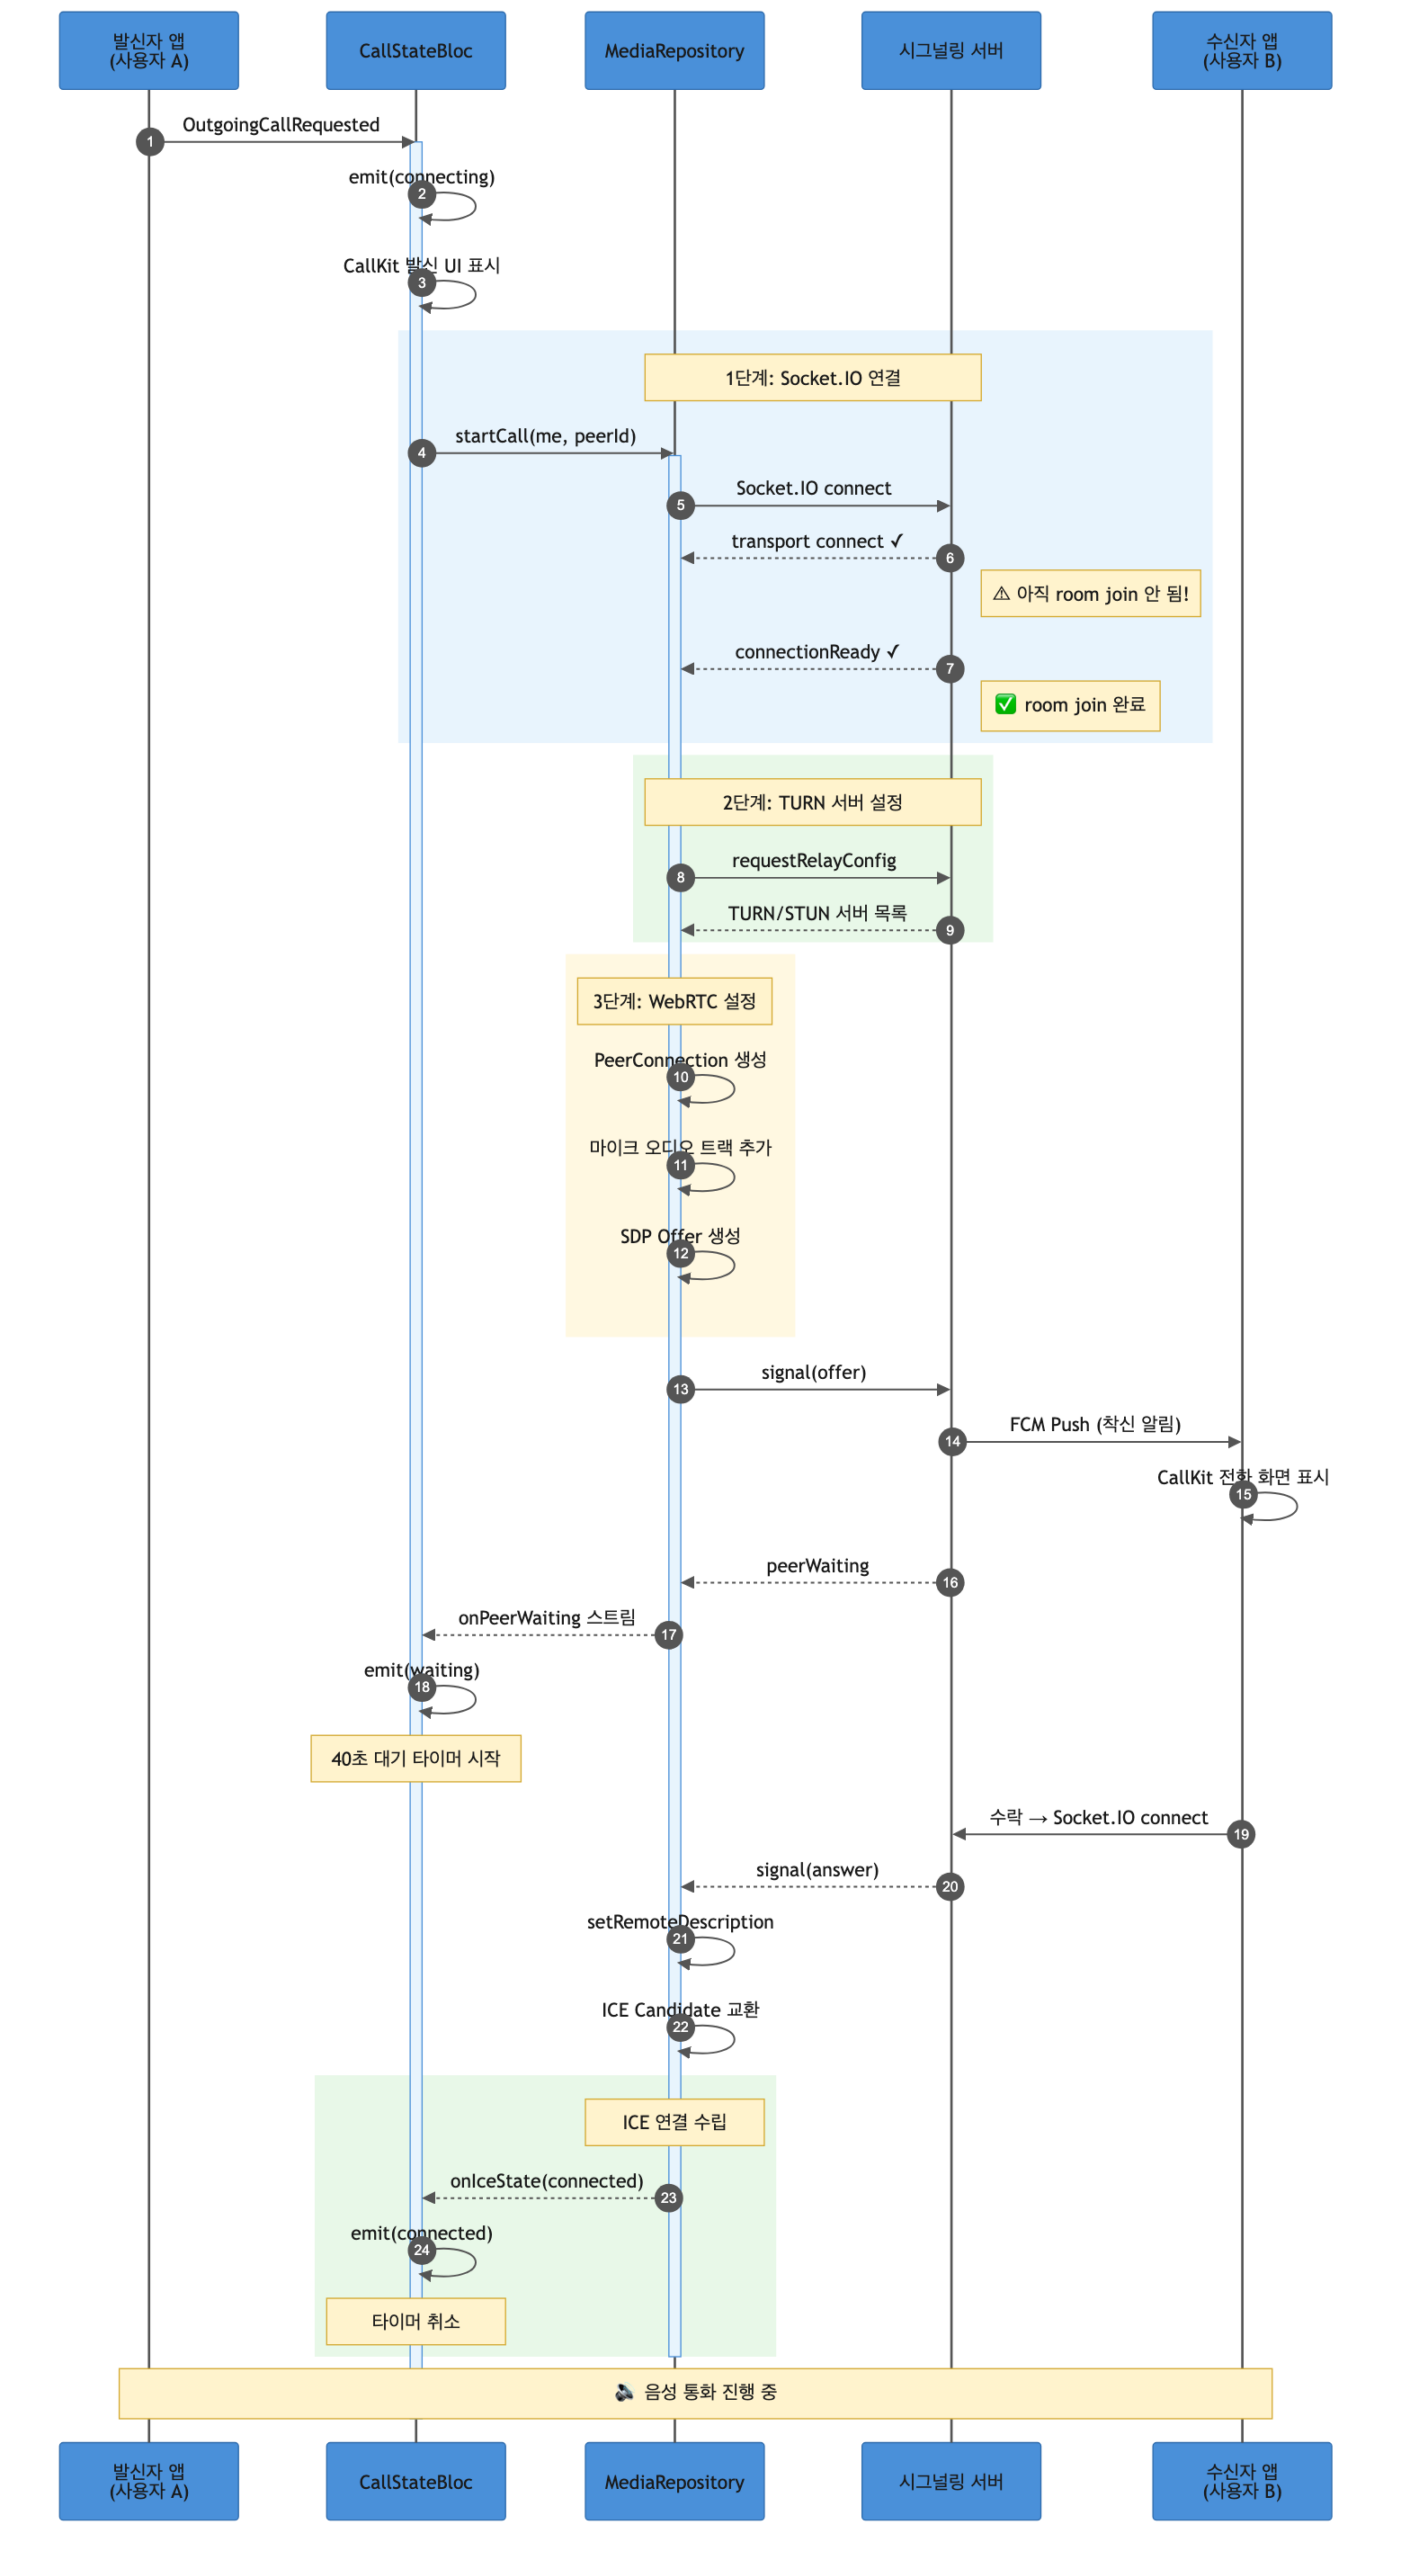
3-1. “connect 됐는데 왜 안 돼요?”
WebRTC 연결의 첫 단계는 시그널링 서버(Socket.IO)에 접속하는 것이다. MediaRepositoryImpl의 startCall() 흐름은 이렇다:
Future<Result<void>> startCall({
  required UserInfo me,
  required String peerId,
}) async {
  _currentPeerId = peerId;
  _isInitiator = true;

  // 1단계: Socket 연결 + 서버 준비 확인 (10초 타임아웃)
  final connected = await _connectAndWaitForReady(peerId);
  if (!connected) {
    _releaseResources();
    return Result(error: Exception("서버 연결 타임아웃"));
  }

  // 2단계: TURN 릴레이 서버 설정 요청
  final iceServers = await _fetchRelayConfig();

  // 3단계: PeerConnection 생성 (TURN/STUN 서버 포함)
  await _createPeerConnection(iceServers: iceServers);

  // 4단계: 마이크 오디오 트랙 추가
  await _attachAudioTracks();

  // 5단계: SDP Offer 생성 & 서버를 통해 상대방에게 전송
  final offer = await _peerConnection!.createOffer();
  await _peerConnection!.setLocalDescription(offer);
  _signalingSource.sendSignal(payload: {
    'targetId': peerId,
    'type': 'offer',
    'data': offer.toMap(),
  });

  return Result<void>();
}
1단계에서 가장 처음 만난 함정이 있었다. Socket.IO의 connect 이벤트가 발생했으니 바로 시그널을 보내면 될 줄 알았다. 안 된다.
connect 이벤트는 **전송 계층(transport level)**에서 TCP/WebSocket 연결이 수립되었다는 의미일 뿐이다. 서버의 connection handler가 실행되어 이 소켓을 방(room)에 참여시키는 것은 그 이후다. connect 직후에 signal을 emit하면, 서버가 아직 소켓을 방에 넣지 않았기 때문에 상대방에게 전달되지 않는다.
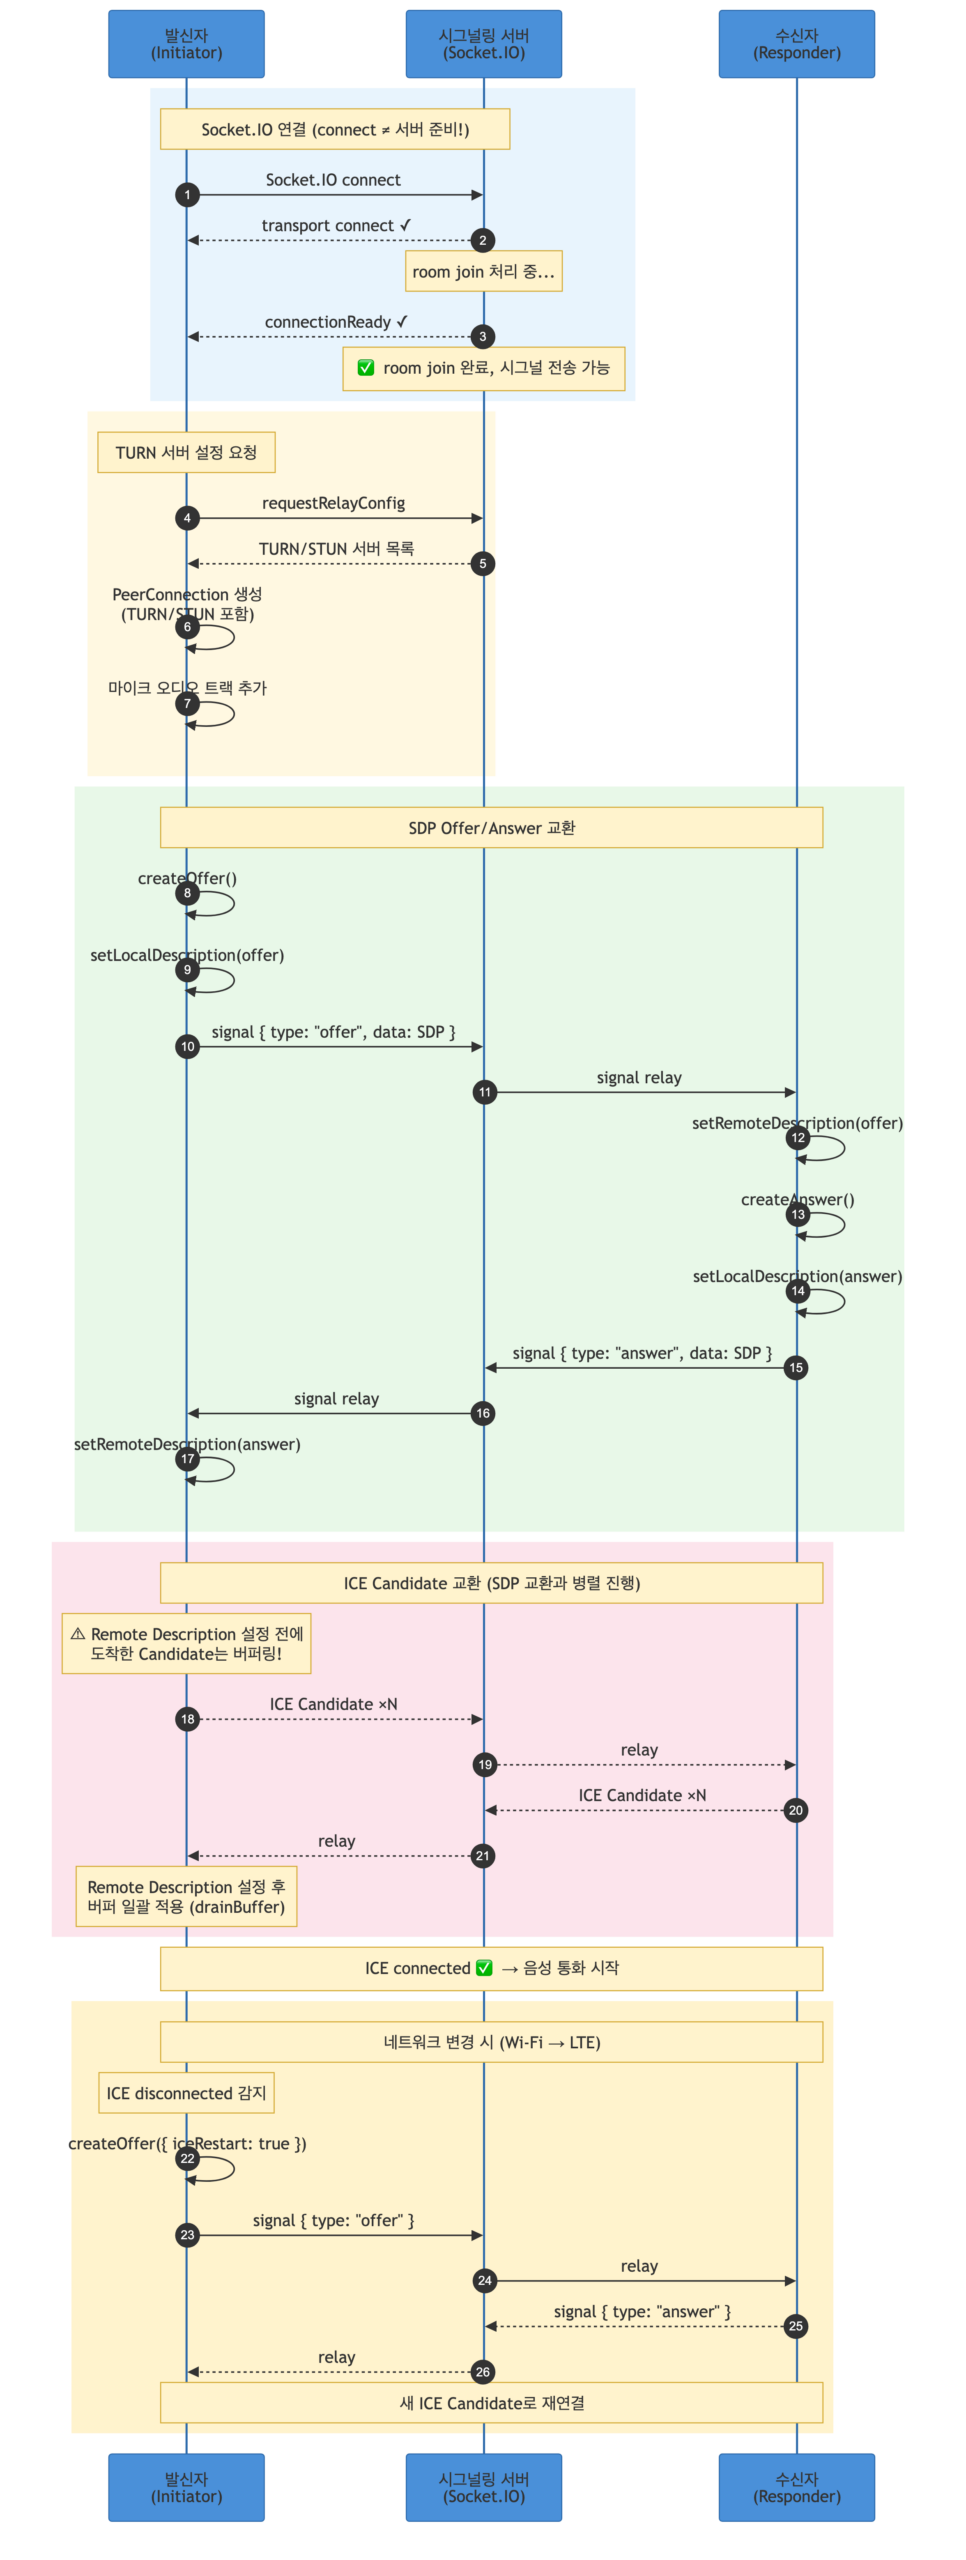
그래서 서버가 명시적으로 보내는 connectionReady 이벤트를 기다리도록 했다. Completer와 10초 타임아웃으로:
Future<bool> _connectAndWaitForReady(String peerId) async {
  _socketClient.prepare(
    endpoint: _configSource.getServerUrl(),
    token: _configSource.getAuthToken() ?? "",
    targetId: peerId,
  );
  _eventSource.bindSocketEvents();
  _startListeningSignals();

  final completer = Completer<void>();
  late final StreamSubscription sub;
  sub = _eventSource.onConnectionReadyEvent().listen((_) {
    if (!completer.isCompleted) completer.complete();
    sub.cancel();
  });

  _socketClient.connect();

  try {
    await completer.future.timeout(const Duration(seconds: 10));
    return true;
  } on TimeoutException {
    return false;
  } finally {
    sub.cancel();
  }
}
이 10초 안에 connectionReady가 안 오면 연결 실패로 처리한다. 실제로 서버 부하가 높을 때 이 타임아웃에 걸리는 경우가 있었고, 사용자에게는 “연결에 실패했습니다” 메시지를 보여준다.
3-2. 양쪽이 동시에 Offer를 보내는 “Glare” 충돌
WebRTC에서 통화를 시작하려면 한쪽이 SDP Offer를 보내고, 상대방이 SDP Answer를 보내야 한다. 그런데 네트워크 지연으로 양쪽이 거의 동시에 Offer를 보내는 상황이 생길 수 있다. 이걸 “Glare”라고 부른다.
Glare가 발생하면 양쪽 모두 signalingState가 HaveLocalOffer 상태인데 상대의 Offer가 도착한다. 이때 누가 양보할지를 정해야 한다. 우리는 발신자(initiator)가 고집을 부리고, 수신자(responder)가 양보하는 Perfect Negotiation 패턴을 적용했다:
Future<void> _handleIncomingOffer(dynamic data) async {
  final sdp = _parseSessionDescription(data);
  if (sdp == null) return;

  // PeerConnection이 아직 생성되지 않았으면 버퍼에 저장
  if (_peerConnection == null) {
    _bufferedOffer = sdp;
    return;
  }

  final signalingState = _peerConnection!.signalingState;

  // Glare 상황: 내가 이미 Offer를 보낸 상태에서 상대의 Offer가 도착
  if (signalingState == RTCSignalingState.RTCSignalingStateHaveLocalOffer) {
    if (_isInitiator) {
      // 발신자(Impolite Peer): "내 Offer가 우선이야" → 상대 Offer 무시
      return;
    }
    // 수신자(Polite Peer): "알겠어, 내 Offer 철회할게" → rollback 후 상대 Offer 수락
    await _peerConnection!.setLocalDescription(
      RTCSessionDescription(null, 'rollback'),
    );
  }

  // 상대의 Offer를 수락하고 Answer 생성
  await _applyOfferAndRespond(sdp);
}
_isInitiator 플래그 하나로 역할을 구분한다. 발신자가 startCall()을 호출하면 _isInitiator = true, 수신자가 acceptCall()을 호출하면 _isInitiator = false가 된다. 이 플래그가 Glare 충돌의 승자를 결정한다.
3-3. 아직 상대방의 SDP를 안 받았는데 ICE Candidate가 먼저 온다
WebRTC의 ICE Candidate 교환은 SDP 교환과 병렬로 진행된다. 그래서 Remote Description(상대의 SDP)이 설정되기 전에 상대의 ICE Candidate가 먼저 도착하는 경우가 흔하다. 이 상태에서 addCandidate()를 호출하면 에러가 난다.
해결책: 버퍼에 모아뒀다가 Remote Description이 설정된 후 한꺼번에 적용한다.
final List<RTCIceCandidate> _candidateBuffer = [];
bool _remoteDescApplied = false;

Future<void> _handleIceCandidate(dynamic data) async {
  final candidate = _parseIceCandidate(data);
  if (candidate == null) return;

  // Remote Description이 아직 없으면 버퍼에 저장
  if (_peerConnection == null || !_remoteDescApplied) {
    _candidateBuffer.add(candidate);
    return;
  }

  await _peerConnection!.addCandidate(candidate);
}

// Remote Description 설정 직후 호출
Future<void> _drainCandidateBuffer() async {
  if (_peerConnection == null || _candidateBuffer.isEmpty) return;
  for (final candidate in List.of(_candidateBuffer)) {
    await _peerConnection!.addCandidate(candidate);
  }
  _candidateBuffer.clear();
}
_handleAnswer()와 _applyOfferAndRespond() 안에서 setRemoteDescription() 호출 직후에 _drainCandidateBuffer()를 호출한다. 이렇게 하면 SDP와 ICE Candidate의 도착 순서에 관계없이 안전하게 연결이 수립된다.
3-4. Wi-Fi에서 LTE로 바뀌면 통화가 끊긴다
통화 중에 사용자가 Wi-Fi 범위를 벗어나면 ICE 연결이 disconnected 상태가 된다. 이때 자동으로 ICE Restart를 시도한다. 새로운 ICE Candidate를 수집해서 LTE 경로로 재연결하는 것이다:
_peerConnection!.onIceConnectionState = (RTCIceConnectionState state) {
  // ICE 상태를 도메인 enum으로 변환하여 BLoC에 전달
  final mapped = _mapToIceStatus(state);
  if (mapped != null) _iceStatusController.add(mapped);

  // disconnected 감지 → 자동 ICE Restart
  if (state == RTCIceConnectionState.RTCIceConnectionStateDisconnected) {
    _performIceRestart();
  }
};

Future<void> _performIceRestart() async {
  if (_peerConnection == null || _currentPeerId == null) return;
  try {
    // iceRestart: true 옵션으로 새 Offer 생성
    // → 새로운 ICE Candidate가 수집됨
    final offer = await _peerConnection!.createOffer({'iceRestart': true});
    await _peerConnection!.setLocalDescription(offer);

    _signalingSource.sendSignal(payload: {
      'targetId': _currentPeerId,
      'type': 'offer',
      'data': offer.toMap(),
    });
  } catch (e) {
    debugPrint('ICE Restart 실패: $e');
  }
}
disconnected는 아직 “완전히 끊어졌다”는 의미가 아니다. 네트워크 경로를 잃었지만 새 경로를 찾으면 복구될 수 있다. failed가 되면 그때 진짜 통화 실패를 선언한다. 이 차이가 중요하다. disconnected에서 바로 통화를 끊어버리면 Wi-Fi→LTE 전환 같은 일시적 단절에서 불필요하게 통화가 종료된다.
3-5. TURN 서버 없이는 대부분의 통화가 안 된다
대부분의 네트워크 환경은 NAT 뒤에 있다. STUN 서버만으로는 NAT를 뚫지 못하는 경우가 많아서, TURN 릴레이 서버가 필수적이었다. 서버에 TURN 설정을 요청하고, 응답이 올 때까지 최대 10초를 기다린다:
Future<List<Map<String, dynamic>>?> _fetchRelayConfig() async {
  final completer = Completer<dynamic>();
  late final StreamSubscription sub;
  sub = _signalingSource.onRelayConfigEvent().listen((data) {
    if (!completer.isCompleted) completer.complete(data);
    sub.cancel();
  });

  _signalingSource.requestRelayConfig();

  try {
    final configData = await completer.future.timeout(
      const Duration(seconds: 10),
    );
    return _parseRelayConfig(configData);
  } catch (e) {
    // TURN 설정 실패 시 STUN만으로 시도 (대부분 실패하겠지만)
    return null;
  } finally {
    sub.cancel();
  }
}
TURN 설정이 실패하면 STUN만으로 연결을 시도하는데, 엄격한 NAT 환경에서는 거의 실패한다. 그래서 TURN 서버의 안정성이 전체 서비스 품질에 직결된다.
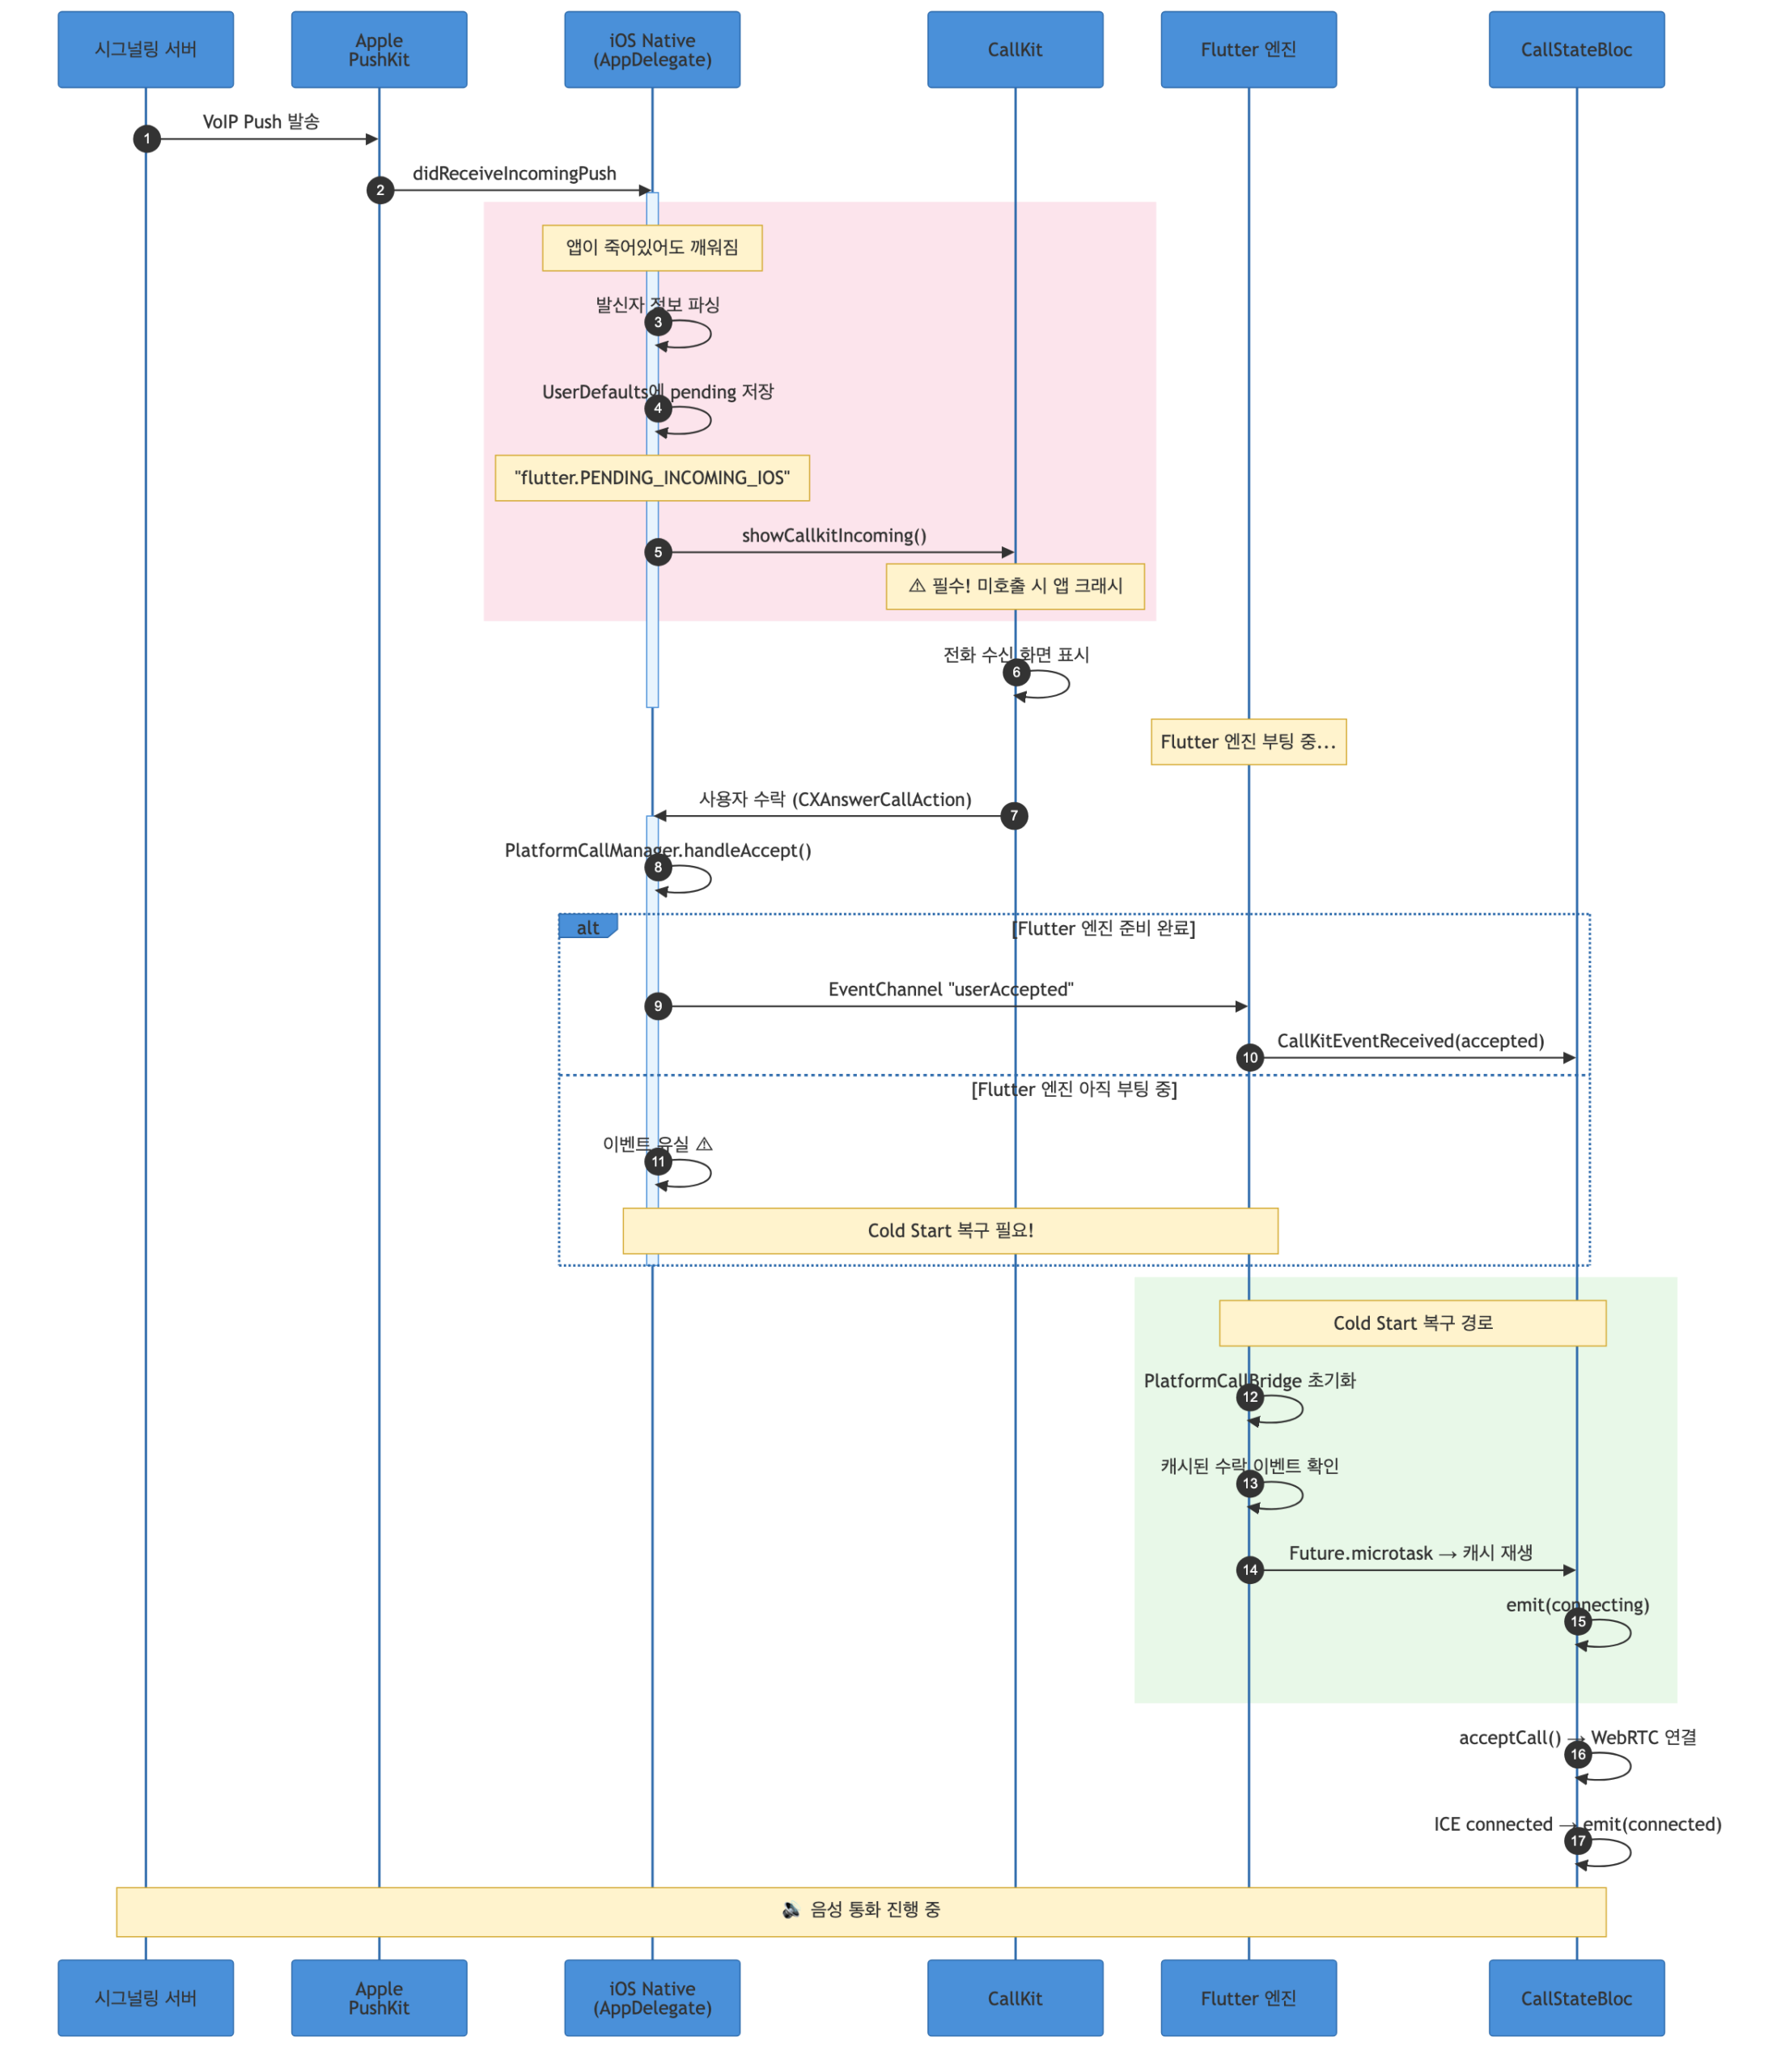
4장. iOS 착신 — PushKit이 깨운 세계
4-1. PushKit VoIP 푸시: 앱이 죽어도 살아난다
서버가 수신자에게 전화를 보내면, iOS에서는 PushKit VoIP 푸시가 발송된다. 이 푸시는 일반 APNs와 근본적으로 다르다:
- 앱이 완전히 종료(kill)된 상태에서도 앱을 깨운다
- 백그라운드에서 코드를 실행할 수 있다
- 반드시 CallKit UI를 표시해야 한다 (미표시 시 앱 크래시, Apple 정책)
AppDelegate에서 PushKit 콜백을 받아 처리한다:
func pushRegistry(
    _ registry: PKPushRegistry,
    didReceiveIncomingPushWith payload: PKPushPayload,
    for type: PKPushType,
    completion: @escaping () -> Void
) {
    guard type == .voIP else {
        completion()
        return
    }

    let data = payload.dictionaryPayload

    // 서버 페이로드에서 발신자 정보 추출
    let callerName = data["callerName"] as? String ?? "알 수 없음"
    let callerOrg = data["callerOrg"] as? String ?? ""
    let callerId = data["callerUUID"] as? String ?? ""

    // ⭐ Cold Start 복구를 위해 UserDefaults에 착신 정보 저장
    // Flutter 엔진이 아직 부팅되지 않았을 수 있으므로,
    // 나중에 Flutter 쪽에서 읽어갈 수 있도록 저장해둔다
    if !callerId.isEmpty {
        let pendingData: [String: Any] = [
            "callerId": callerId,
            "callerName": callerName,
            "callerOrg": callerOrg,
            "timestamp": Date().timeIntervalSince1970,
        ]
        if let jsonData = try? JSONSerialization.data(withJSONObject: pendingData),
           let jsonString = String(data: jsonData, encoding: .utf8) {
            // "flutter." 프리픽스: Flutter의 SharedPreferences와 동일한 저장소를 공유
            UserDefaults.standard.set(jsonString, forKey: "flutter.PENDING_INCOMING_IOS")
            UserDefaults.standard.synchronize()
        }
    }

    // 발신자 표시명 조합 (이름 + 소속)
    let displayName = callerOrg.isEmpty ? callerName : "\(callerName)(\(callerOrg))"

    // CallKit 전화 화면 표시 (필수! 미호출 시 앱 크래시)
    let callData = Data(id: callId, nameCaller: displayName, handle: handle, type: 0)
    callData.extra = [
        "callerId": callerId,
        "callerName": callerName,
        "callerOrg": callerOrg,
    ]
    SwiftFlutterCallkitIncomingPlugin.sharedInstance?
        .showCallkitIncoming(callData, fromPushKit: true)

    completion()
}
여기서 UserDefaults에 저장하는 부분이 나중에 Cold Start 복구의 핵심이 된다. 이 시점에서 Flutter 엔진이 아직 살아나지 않았을 수 있기 때문이다.
4-2. CallKit 이벤트: 수락/거절/종료/타임아웃
사용자가 CallKit 화면에서 행동하면 네이티브 콜백이 호출된다:
// 사용자가 수락 버튼을 탭
func onAccept(_ call: Call, _ action: CXAnswerCallAction) {
    PlatformCallManager.shared.handleAccept(call: call, action: action)
    // → Socket.IO 연결 시작, Flutter에 "userAccepted" 이벤트 전달
}

// 사용자가 거절 버튼을 탭
func onDecline(_ call: Call, _ action: CXEndCallAction) {
    PlatformCallManager.shared.handleDecline(call: call, action: action)
    // → 서버에 sendCallEnd 전송, Flutter에 "userDeclined" 이벤트 전달
}

// 통화 중 종료 (CallKit UI의 빨간 버튼)
func onEnd(_ call: Call, _ action: CXEndCallAction) {
    PlatformCallManager.shared.handleEnd(call: call, action: action)
    // → Flutter에 "userHangup" 이벤트 전달
}

// 30초간 미응답 시 시스템이 자동 종료
func onTimeOut(_ call: Call) {
    PlatformCallManager.shared.handleTimeout(call: call)
    // → 서버에 sendCallEnd 전송
}
PlatformCallManager는 이 이벤트들을 받아서 필요한 네이티브 비즈니스 로직(소켓 연결/해제, sendCallEnd 전송)을 처리한 뒤, EventChannel을 통해 Flutter에 알린다. Flutter의 CallStateBloc은 이 이벤트를 받아 UI 상태만 전이시킨다.
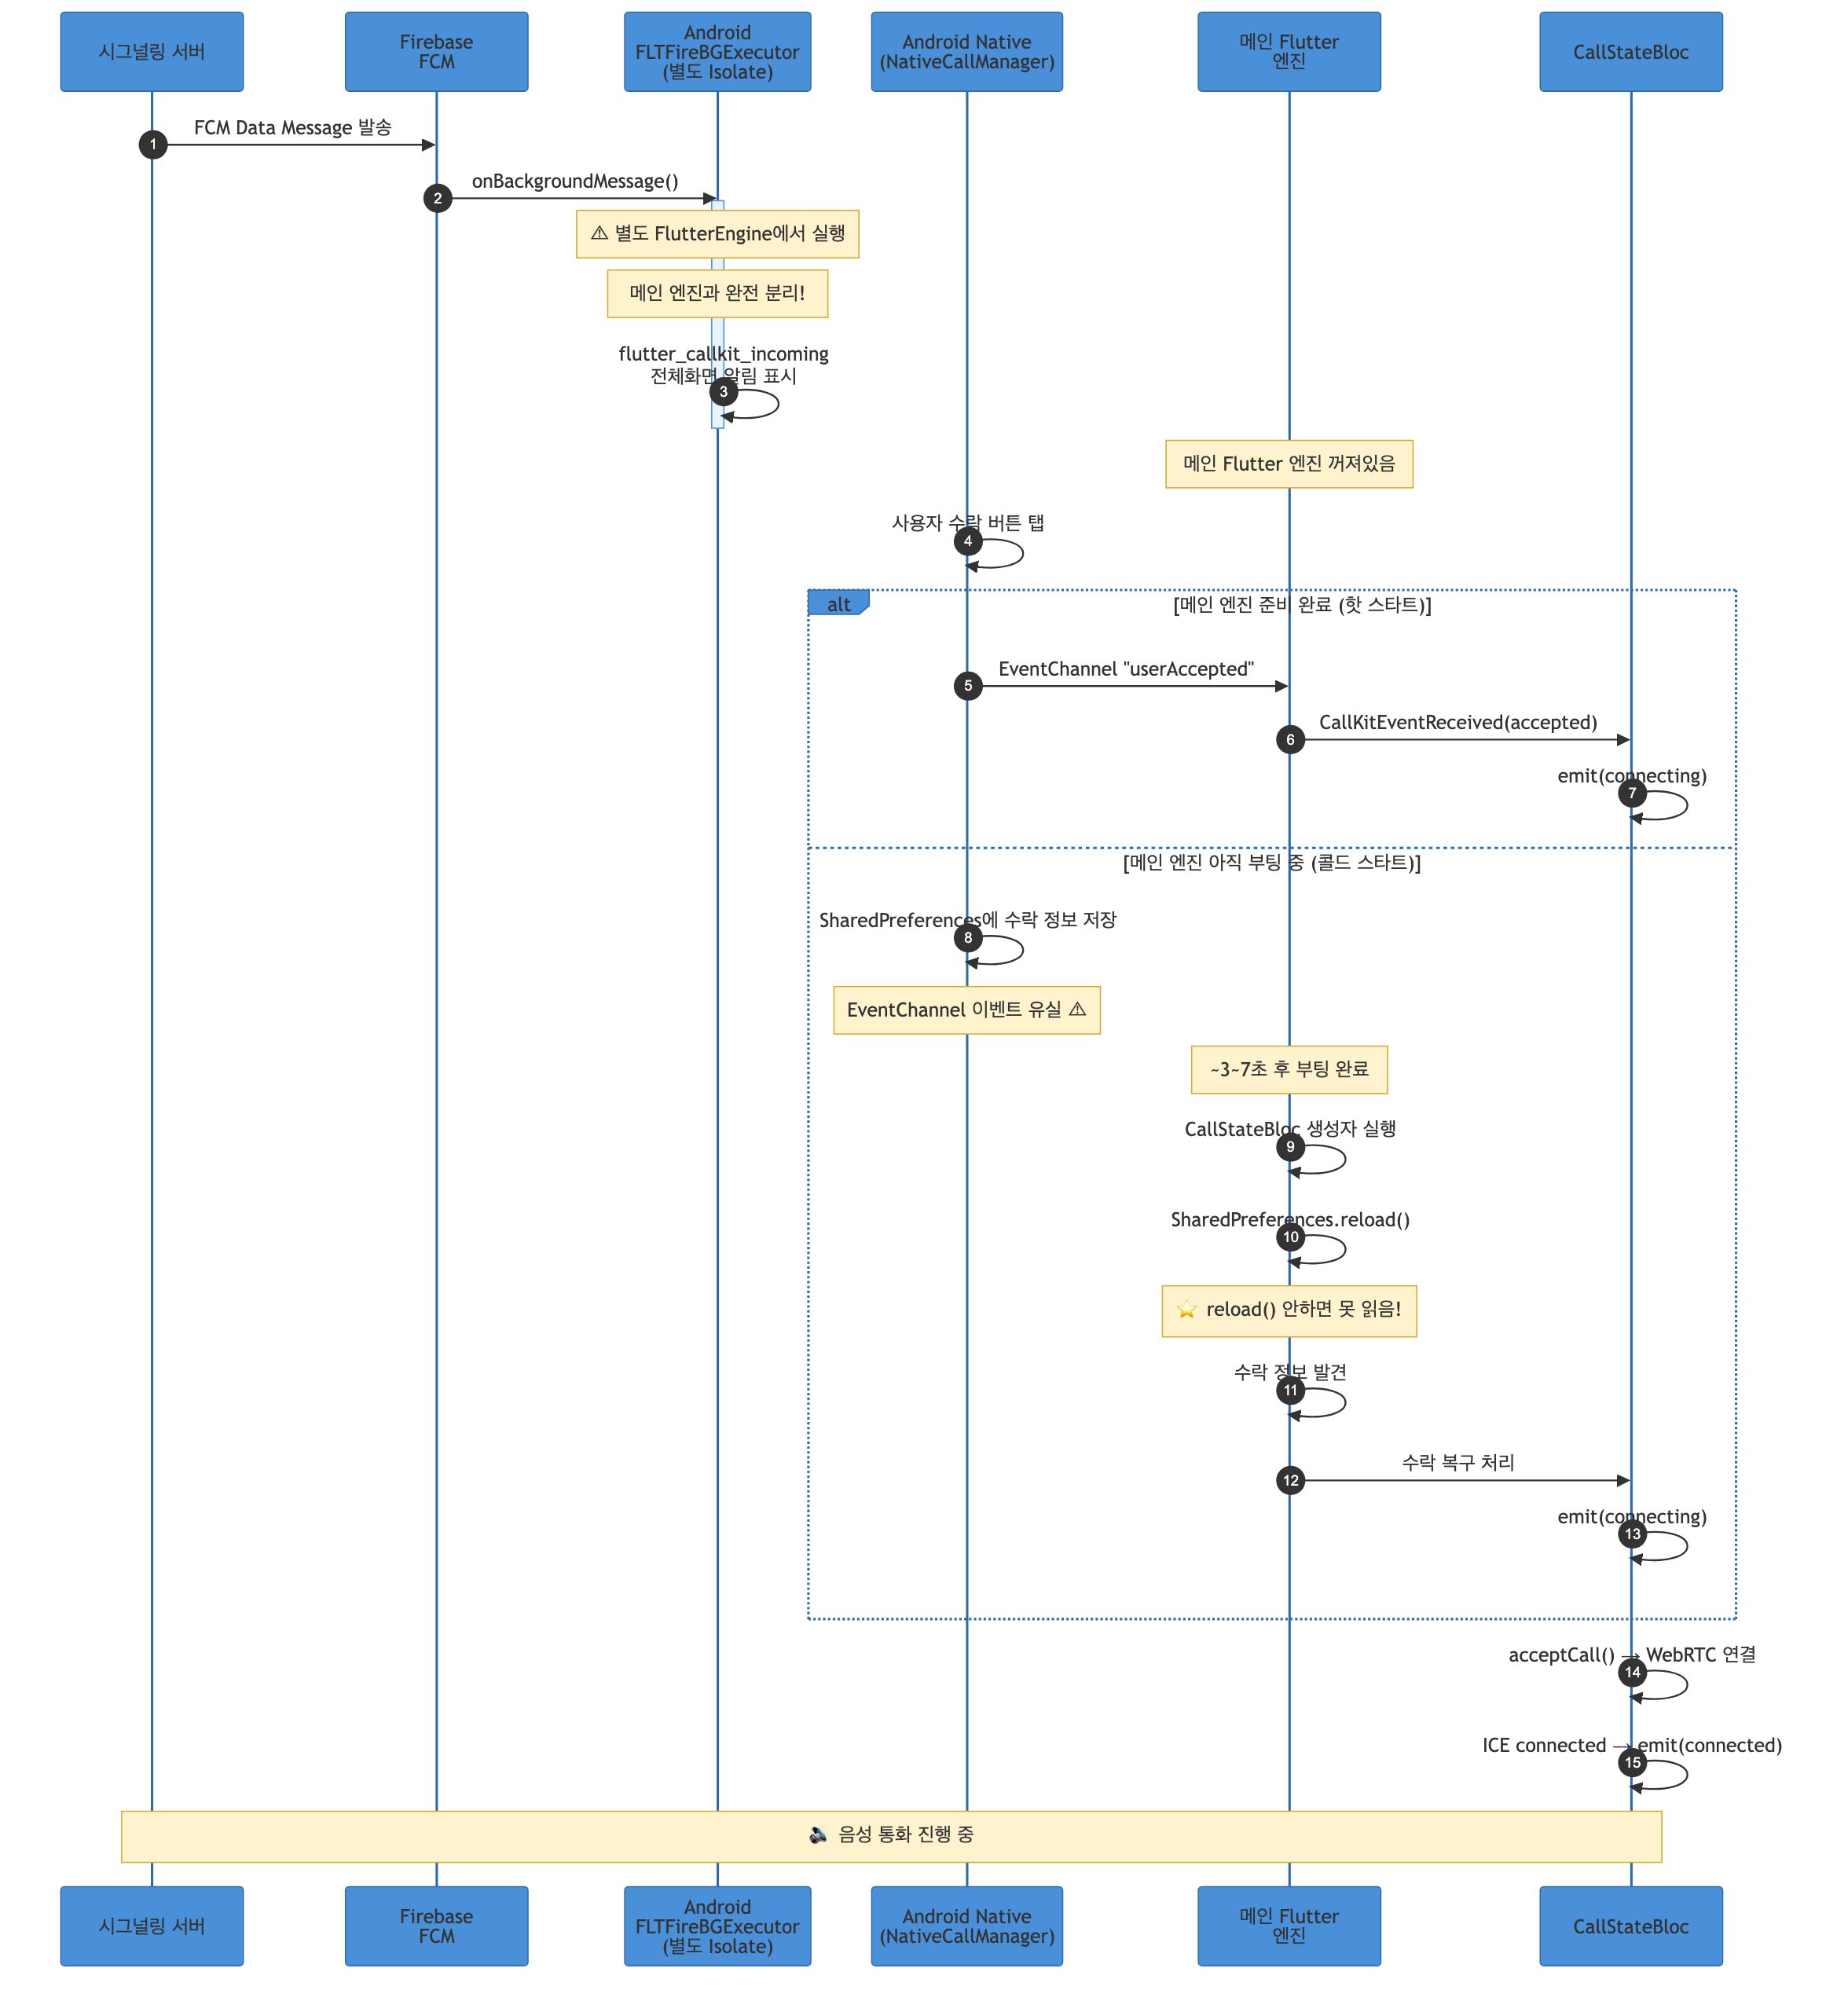
5장. Android 착신 — 별도 엔진의 덫
5-1. FCM Background Handler의 분리된 세계
Android에서는 FCM 데이터 메시지로 착신을 처리한다. 앱이 죽어있으면 FCM background handler가 실행되는데, 이것이 **메인 Flutter 엔진과는 별도의 Isolate(FLTFireBGExecutor)**에서 동작한다.
이 말은:
- background handler에서 보내는 EventChannel 이벤트는 메인 엔진에 도달하지 않는다
flutter_callkit_incoming이 전체화면 알림을 띄우고, 사용자가 수락하면 메인 엔진이 부팅된다- 하지만 메인 엔진이 완전히 초기화되기까지 약 3~7초가 걸린다
- 사용자는 1초 만에 수락 버튼을 누를 수 있다
수락 이벤트가 유실되는 것이다.
5-2. 거절은 더 까다롭다
거절의 경우, CallkitEventCallback.onCallEvent(DECLINE) 콜백이 호출되는데, 이것도 메인 엔진이 준비되기 전에 발생할 수 있다. 네이티브 Kotlin 코드에서 SharedPreferences에 직접 거절 정보를 저장해두고, 나중에 Flutter가 부팅되면 읽어가도록 했다:
이때 Flutter의 SharedPreferences.getInstance()가 반환하는 인스턴스는 캐시된 데이터를 가지고 있다. 네이티브에서 직접 쓴 값은 이 캐시에 반영되어 있지 않다. 반드시 prefs.reload()를 호출하여 디스크에서 다시 읽어와야 한다. 이걸 몰라서 “거절했는데 거절이 안 되는” 버그를 한참 디버깅했다.
6장. Cold Start 복구 — 타이밍 전쟁
6-1. 문제의 본질
Cold Start의 핵심 문제는 이것이다:
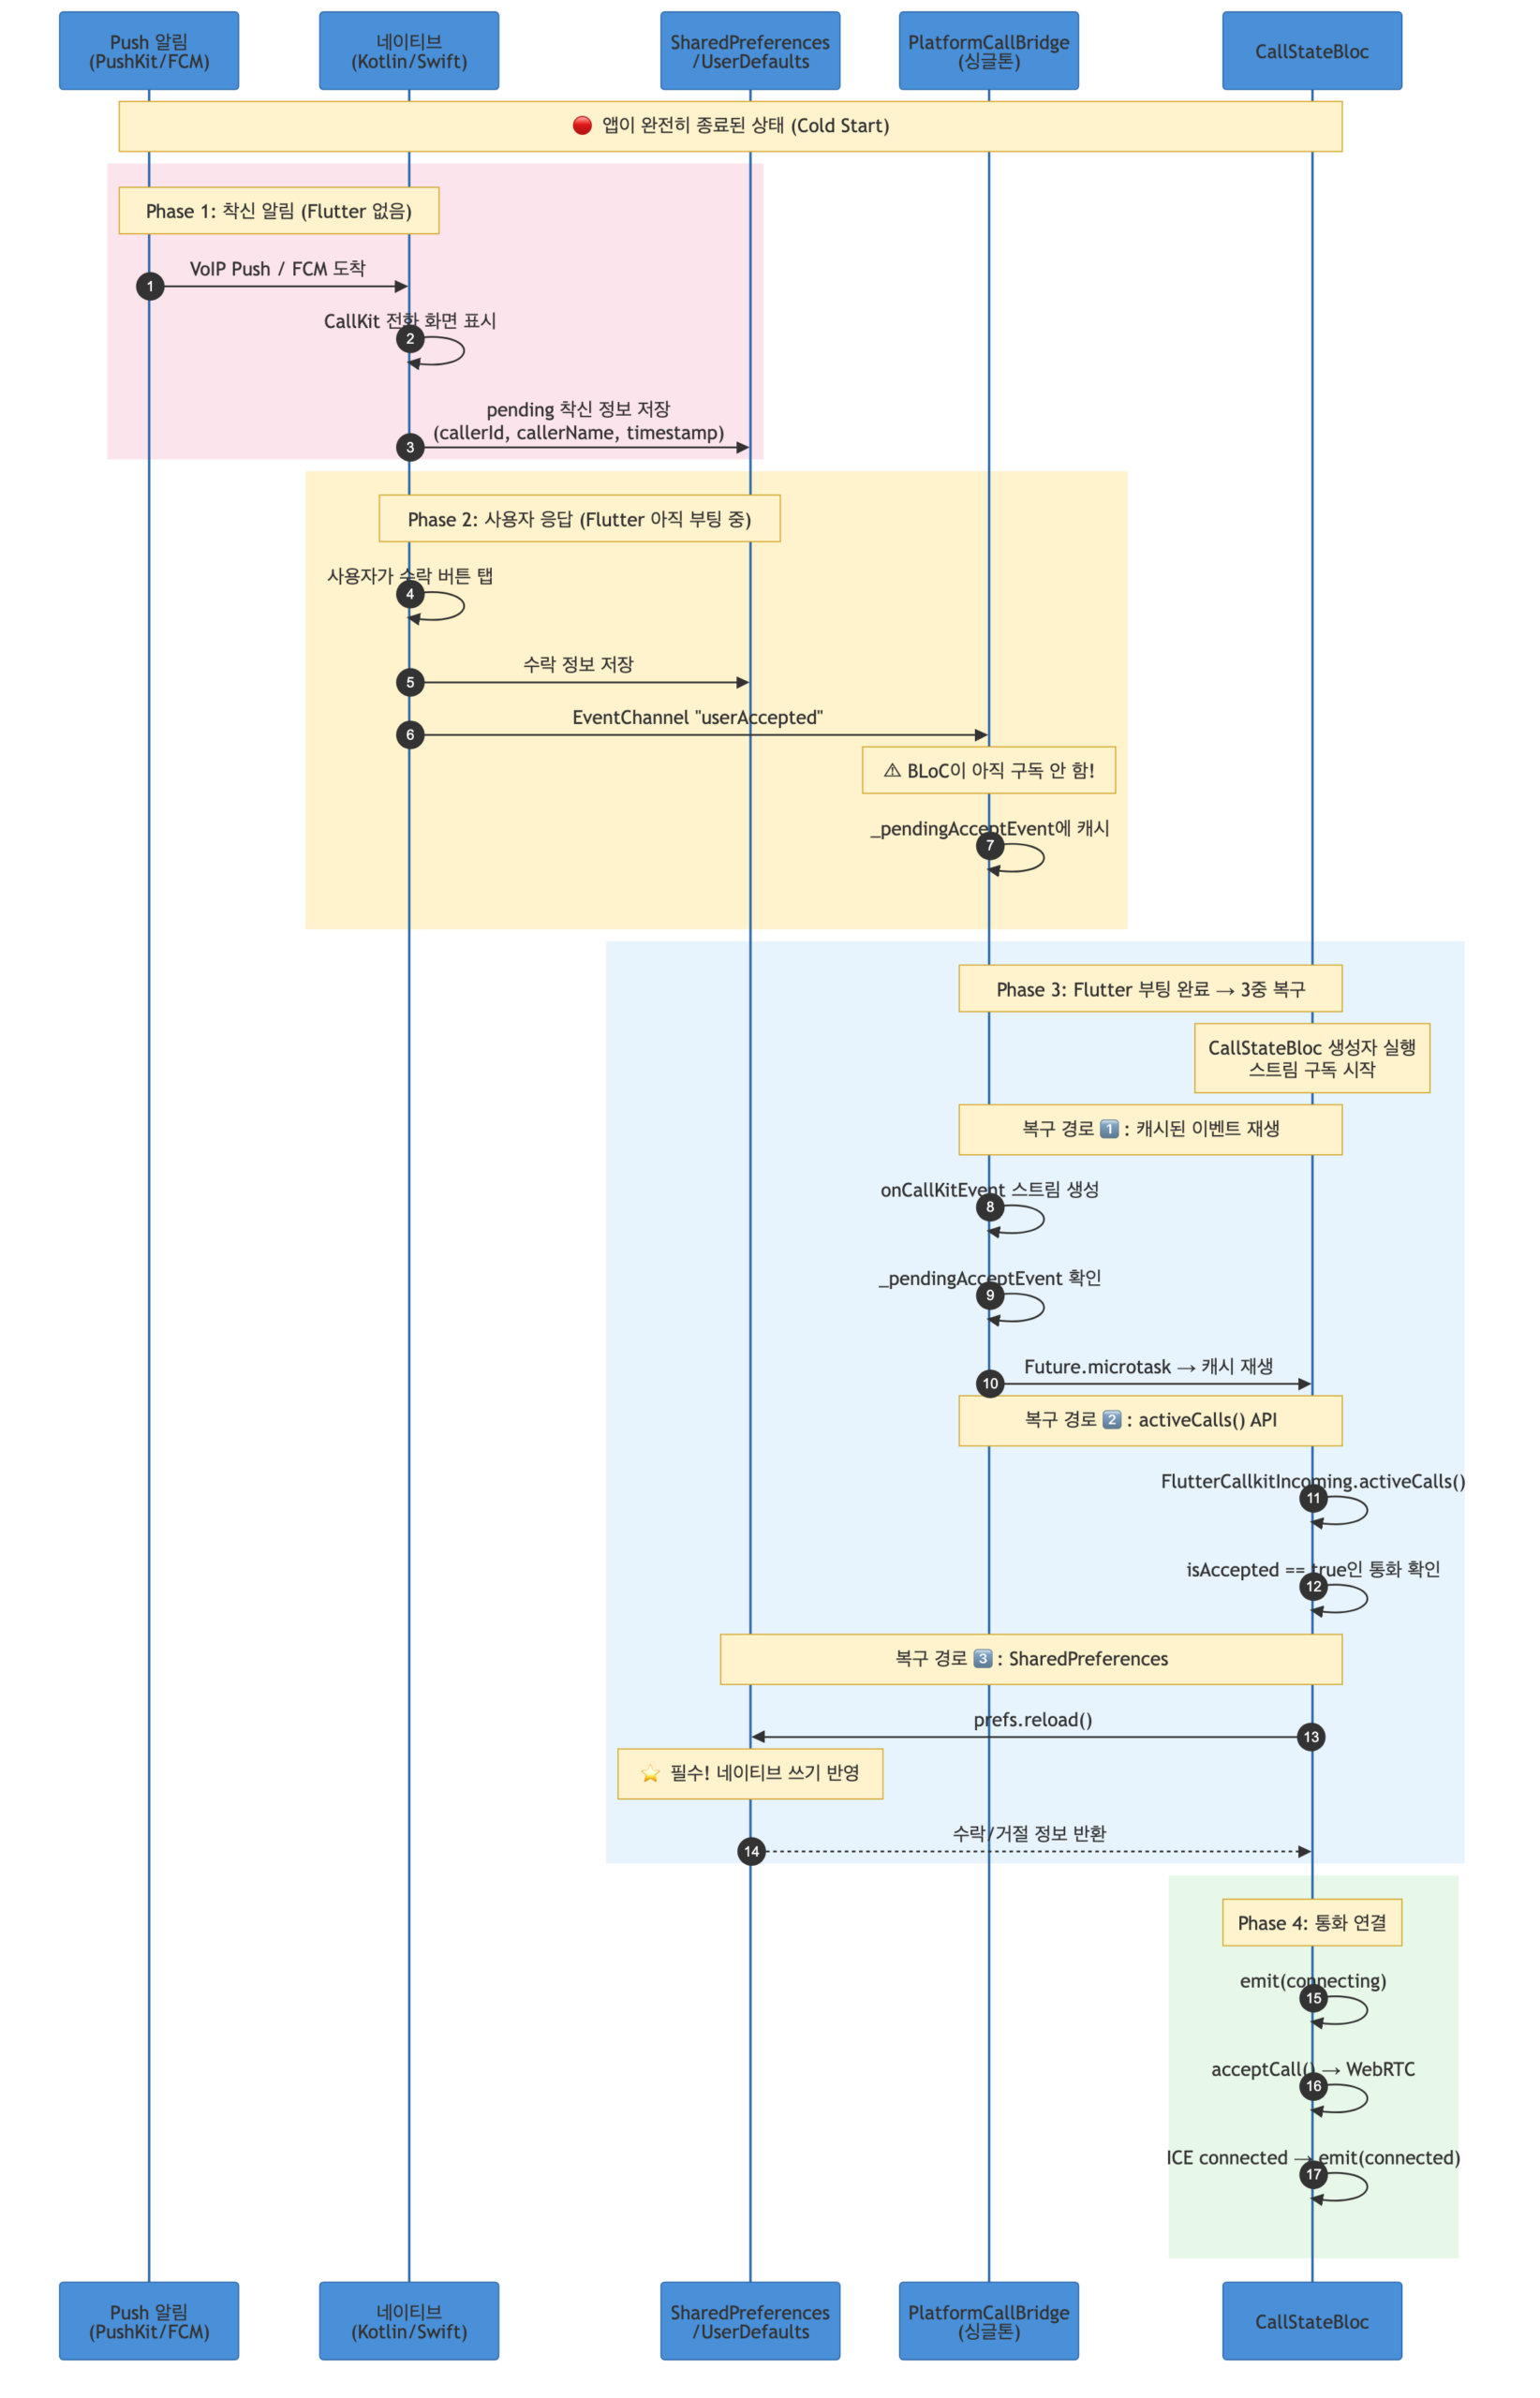
broadcast StreamController는 구독자가 없으면 이벤트를 버린다. 이벤트가 발생했을 때 구독자가 없었으니, 구독자가 나타나도 이미 사라진 이벤트를 받을 수 없다.
6-2. 해결 전략: 3중 안전장치
1단계: 이벤트 캐싱 (PlatformCallBridge)
// 수락 이벤트가 도착하면 무조건 캐시
Map<String, dynamic>? _pendingAcceptEvent;

case "userAccepted":
  if (data is Map) {
    final mapData = Map<String, dynamic>.from(data);
    _pendingAcceptEvent = mapData;  // ← 캐시!
    _acceptedController.add(mapData);
  }
누군가 나중에 onCallKitEvent 스트림을 구독하면, 캐시된 이벤트를 다음 microtask에서 재생한다:
Stream<CallKitEvent> _createMergedCallKitStream() {
  final controller = StreamController<CallKitEvent>.broadcast();

  // 실시간 이벤트 리스닝
  _acceptedController.stream.listen((data) {
    controller.add(CallKitEvent(action: CallAction.accepted, extra: data));
  });
  _declinedController.stream.listen((data) {
    controller.add(CallKitEvent(action: CallAction.declined, extra: data));
  });
  _hangupController.stream.listen((data) {
    controller.add(CallKitEvent(action: CallAction.ended, extra: data));
  });

  // ⭐ Cold Start 복구: 캐시된 수락 이벤트 재생
  if (_pendingAcceptEvent != null) {
    final pending = _pendingAcceptEvent!;
    _pendingAcceptEvent = null;
    // microtask로 스케줄링: 구독자의 listen()이 완료된 후 실행되도록
    Future.microtask(() {
      controller.add(CallKitEvent(action: CallAction.accepted, extra: pending));
    });
  }

  return controller.stream;
}
Future.microtask()가 핵심이다. 동기적으로 add하면 구독자의 listen() 콜백이 아직 등록되지 않았을 수 있다. microtask로 한 틱 미루면 구독이 완료된 후에 이벤트가 전달된다.
2단계: activeCalls() 폴백 (iOS)
Future<Map<String, dynamic>?> getAcceptedCallInfo() async {
  // 1차: flutter_callkit_incoming의 활성 통화 목록에서 확인
  final activeCalls = await FlutterCallkitIncoming.activeCalls();
  if (activeCalls is List && activeCalls.isNotEmpty) {
    for (final call in activeCalls) {
      if (call is Map && call["isAccepted"] == true) {
        final extra = call["extra"];
        if (extra is Map) return Map<String, dynamic>.from(extra);
        if (extra is String && extra.isNotEmpty) {
          try {
            return Map<String, dynamic>.from(jsonDecode(extra) as Map);
          } catch (_) {}
        }
        return <String, dynamic>{};
      }
    }
  }

  // 2차: 네이티브에서 SharedPreferences에 저장해둔 수락 정보
  final prefs = await SharedPreferences.getInstance();
  await prefs.reload();  // ⭐ 네이티브 쓰기를 Flutter 캐시에 반영
  final json = prefs.getString(_acceptedCallKey);
  if (json == null || json.isEmpty) return null;

  try {
    return Map<String, dynamic>.from(jsonDecode(json) as Map);
  } catch (_) {
    await prefs.remove(_acceptedCallKey);
    return null;
  }
}
activeCalls()는 flutter_callkit_incoming이 관리하는 활성 통화 목록이다. CallKit에서 수락된 통화가 있으면 여기서 찾을 수 있다. 없으면 SharedPreferences 폴백으로 넘어간다.
3단계: SharedPreferences 기반 복구 (거절/iOS pending)
Future<Map<String, dynamic>?> getDeclinedCallInfo() async {
  final prefs = await SharedPreferences.getInstance();
  // ⭐ 핵심: reload()를 호출하지 않으면 네이티브에서 쓴 값을 못 읽는다!
  // Flutter의 SharedPreferences는 첫 getInstance() 시점의 데이터를 캐시한다.
  // 네이티브(Kotlin/Swift)에서 같은 SharedPreferences 파일에 직접 쓴 값은
  // 이 캐시에 반영되어 있지 않다.
  await prefs.reload();
  final json = prefs.getString(_declinedCallKey);
  if (json == null || json.isEmpty) return null;

  try {
    return Map<String, dynamic>.from(jsonDecode(json) as Map);
  } catch (_) {
    await prefs.remove(_declinedCallKey);
    return null;
  }
}
iOS의 경우 PushKit 수신 시 저장한 pending 착신 데이터에 60초 유효기간을 두었다:
Future<Map<String, dynamic>?> getPendingIncomingIOS() async {
  final prefs = await SharedPreferences.getInstance();
  await prefs.reload();
  final json = prefs.getString(_pendingIncomingKey);
  if (json == null || json.isEmpty) return null;

  try {
    final data = Map<String, dynamic>.from(jsonDecode(json) as Map);
    final timestamp = data["timestamp"] as num? ?? 0;
    final elapsedSeconds =
        DateTime.now().millisecondsSinceEpoch / 1000 - timestamp.toDouble();

    // 60초 이상 지난 데이터는 이전 통화의 잔여 데이터일 수 있다
    if (elapsedSeconds > 60) {
      await prefs.remove(_pendingIncomingKey);
      return null;
    }
    return data;
  } catch (_) {
    await prefs.remove(_pendingIncomingKey);
    return null;
  }
}
왜 60초인가? PushKit 수신 → CallKit 표시 → 사용자 응답 → Flutter 부팅 완료까지 아무리 오래 걸려도 60초는 넘지 않는다. 60초가 지난 데이터는 이전에 처리되지 않고 남은 잔여 데이터이므로 무시한다.
7장. 레이스 컨디션과의 전쟁
실제 운영에서 만난 6가지 레이스 컨디션과 각각의 해결법이다.
7-1. 수락과 거절이 동시에 복구되는 경우
Cold Start에서 수락과 거절 정보가 SharedPreferences에 동시에 존재할 수 있다. 앱 종료 상태에서 착신 후 수락했는데, 거의 동시에 상대가 취소한 경우다.
둘 다 있으면 수락이 우선이다. 수락 복구를 먼저 시도하고, 성공하면 거절 정보는 무시한다. 수락 복구 실패 시에만 거절 경로로 진입한다.
7-2. 이전 통화의 CALL_CANCEL이 현재 통화를 죽이는 문제
이건 실제로 QA에서 잡힌 버그였다.
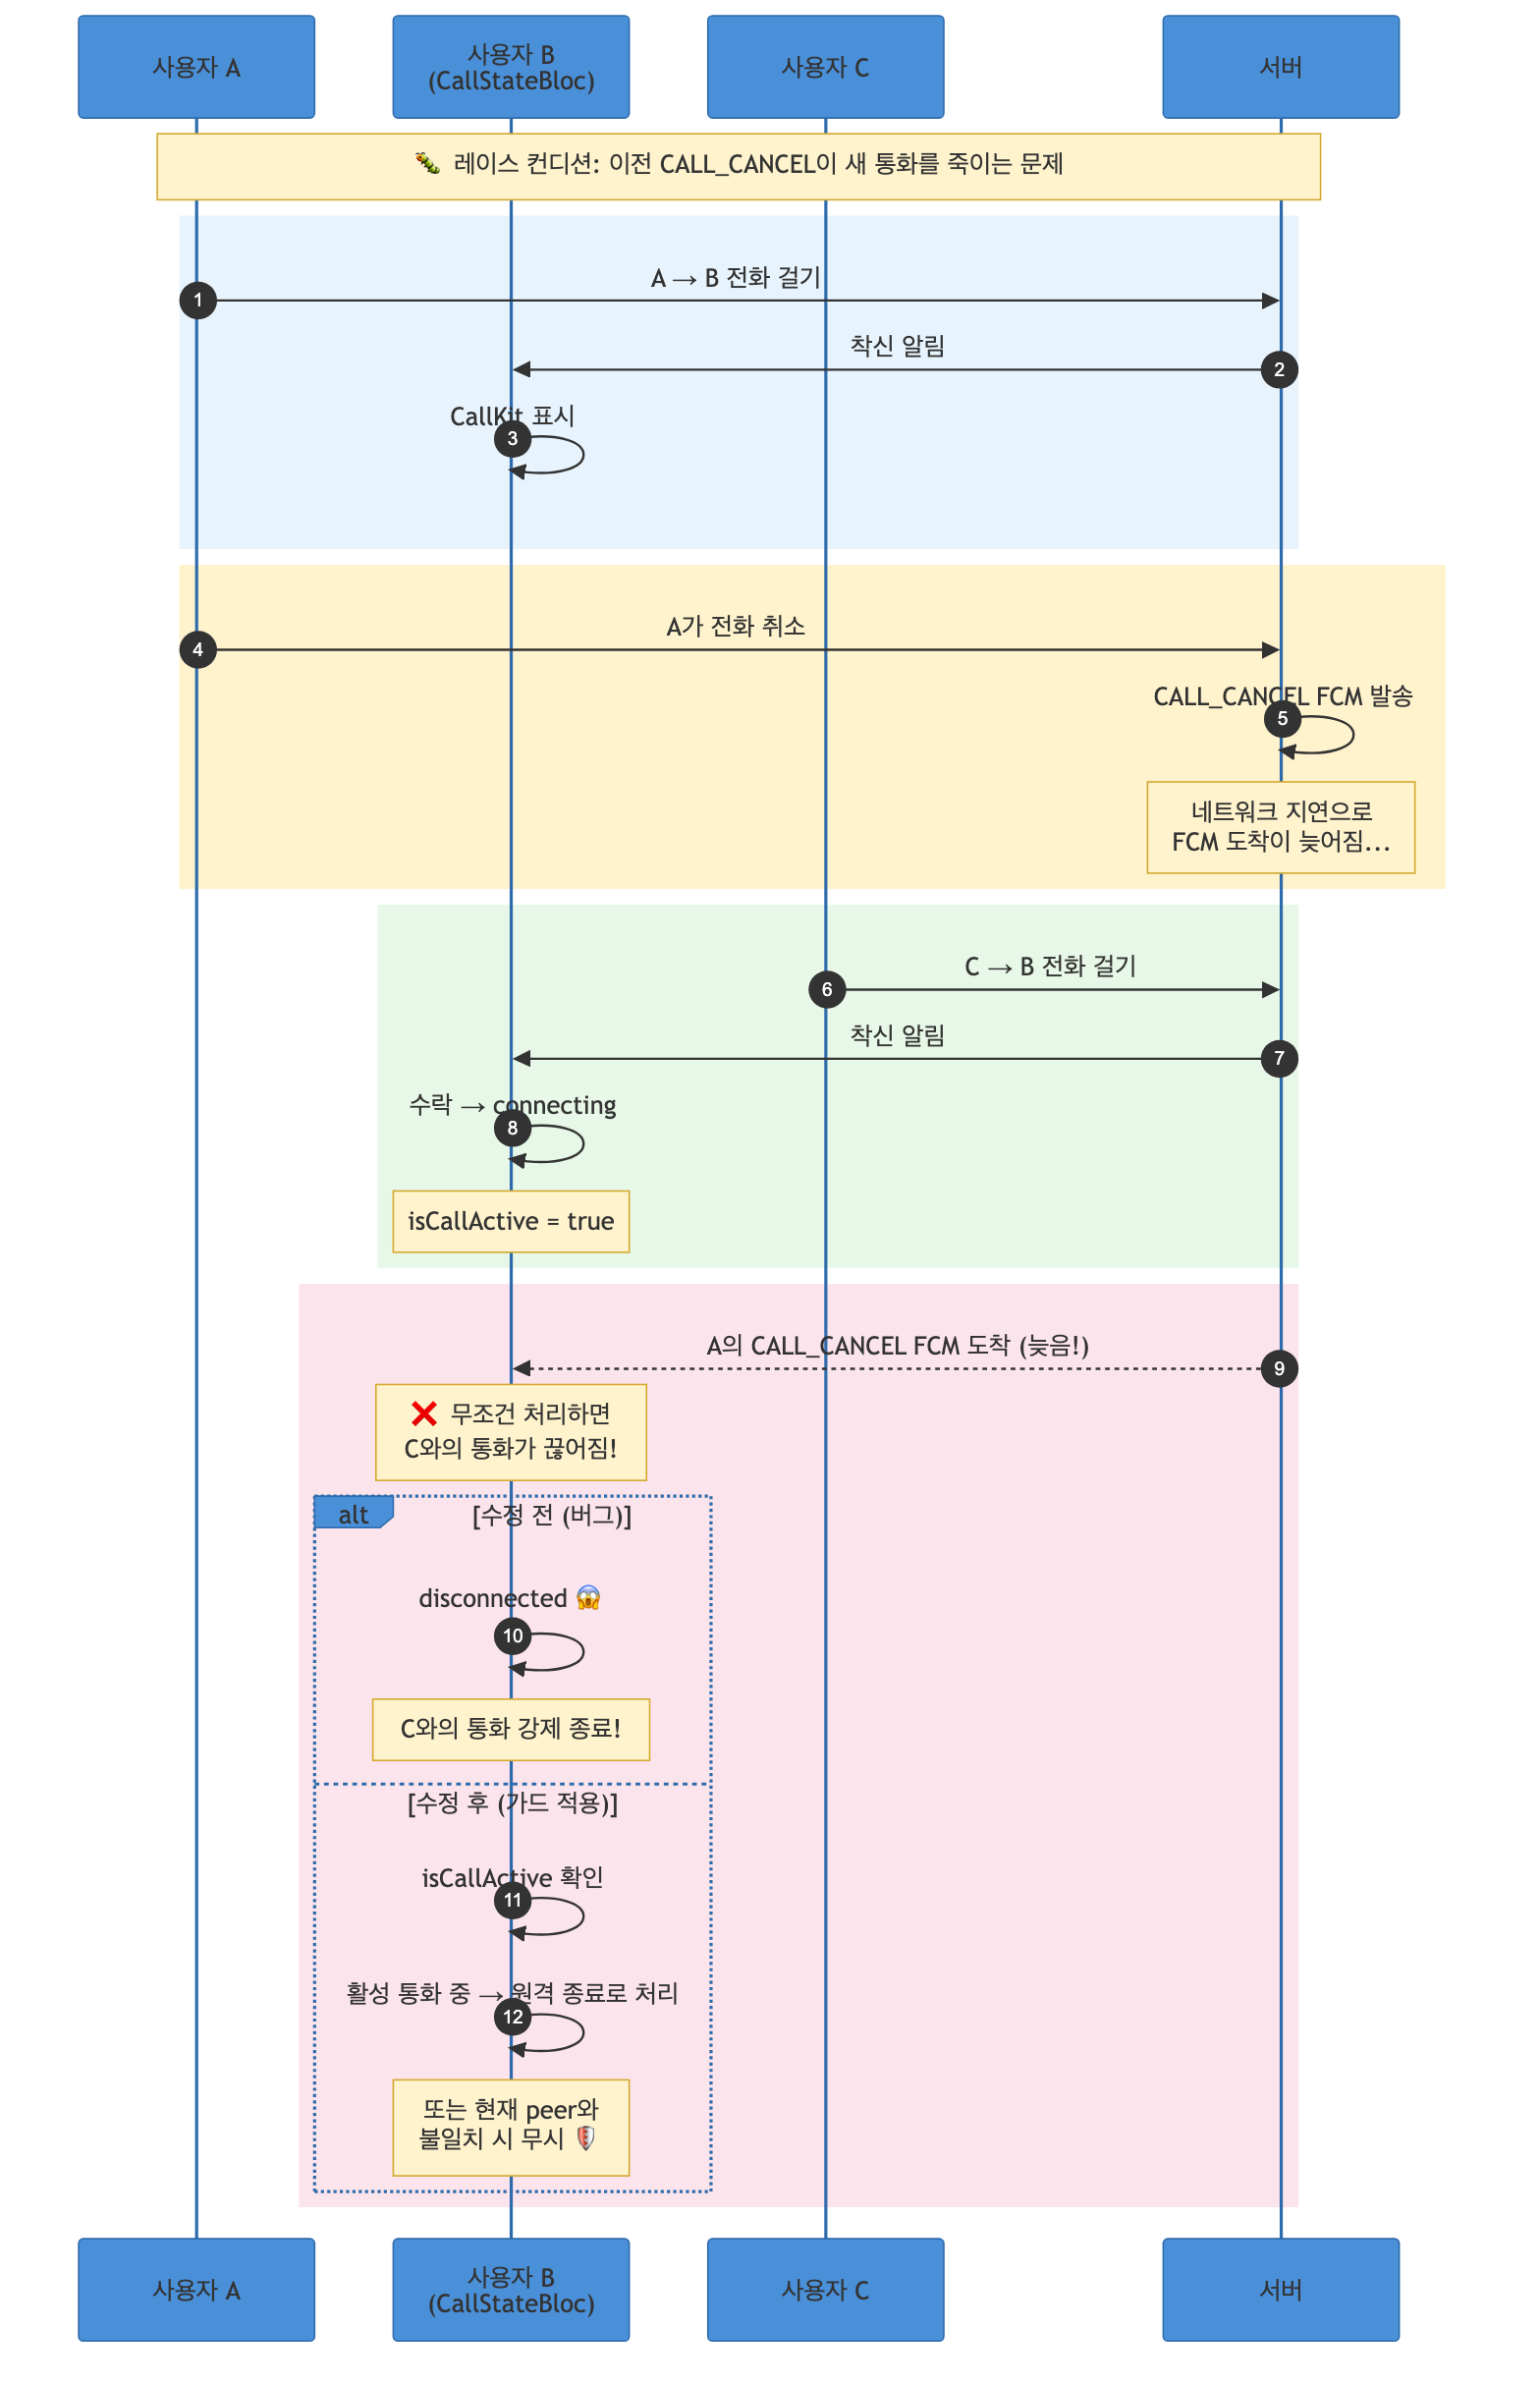
원인: CALL_CANCEL을 받으면 무조건 통화를 종료하고 있었다. 사용자 A의 오래된 CANCEL이 사용자 C와의 진행 중인 통화를 끊어버린 것이다.
해결: isCallActive를 확인하여 현재 활성 통화가 있는 상태에서 CALL_CANCEL을 받으면, “원격 종료”로 처리한다. 활성 통화가 없는 상태에서의 CALL_CANCEL은 단순히 UI만 정리한다.
Future<void> _onCallCancelReceived(
  CallCancelEvent event,
  Emitter<CallState> emit,
) async {
  if (isCallActive) {
    // 통화 중에 CANCEL이 오면 상대방이 취소한 것으로 처리
    // (이전 통화의 늦은 CANCEL일 수도 있지만, 안전하게 종료)
    _waitTimer?.cancel();
    _connectTimer?.cancel();
    await _callUsecase.endCall(peerId: _currentPeerId);
    await _alertService.dismissAllCalls();
    _clearCallInfo();
    emit(CallConnectionState(status: CallStatus.disconnected));
    return;
  }

  // 비통화 상태: 이전 착신에 대한 CANCEL. UI만 정리
  _clearCallInfo();
  emit(CallConnectionState(status: CallStatus.disconnected));
}
7-3. 다른 통화의 CallKit ended 이벤트
CallKit은 ended 이벤트에 발신자 정보를 포함시킬 수 있다. 이전 통화의 ended가 현재 통화에 영향을 주면 안 된다:
case CallAction.ended:
  if (isCallActive) {
    final endedCallerId =
        callKitEvent.extra?['callerId'] as String? ?? "";

    // 다른 상대방의 ended 이벤트는 무시
    if (endedCallerId.isNotEmpty && endedCallerId != _currentPeerId) {
      debugPrint('ended 이벤트 무시 - 다른 상대: $endedCallerId');
      return;
    }

    await _callUsecase.endCall(peerId: _currentPeerId);
    _clearCallInfo();
    emit(CallConnectionState(status: CallStatus.disconnected));
  } else {
    // 비통화 상태: 단순 정리
    _clearCallInfo();
    emit(CallConnectionState(status: CallStatus.disconnected));
  }
7-4. 실패 상태에서 도착하는 뒤늦은 CallKit 이벤트
서버에서 “상대방 통화중(peerBusy)”을 받아서 이미 실패 UI를 보여주고 있는데, 그 직후에 CallKit declined 이벤트가 들어온다. 이걸 처리하면 상태가 targetBusy → disconnected로 바뀌면서 UI가 깜빡인다.
bool get _hasTerminalFailure {
  final s = state;
  return s is CallConnectionState &&
      (s.status == CallStatus.failed ||
       s.status == CallStatus.peerBusy ||
       s.status == CallStatus.peerOffline ||
       s.status == CallStatus.pushFailed);
}

Future<void> _onCallKitEventReceived(
  CallKitEventReceived event,
  Emitter<CallState> emit,
) async {
  final callKitEvent = event.callKitEvent;

  // ⭐ 이미 실패 상태면, 수락만 처리하고 나머지는 무시
  // (거절/종료 이벤트가 늦게 도착해도 실패 UI를 덮어쓰지 않음)
  if (_hasTerminalFailure && callKitEvent.action != CallAction.accepted) {
    return;
  }

  switch (callKitEvent.action) {
    case CallAction.accepted:
      // ...
    case CallAction.declined:
    case CallAction.timeout:
      // ...
    case CallAction.ended:
      // ...
  }
}
“실패 상태에서 수락은 왜 허용하나?”라고 할 수 있는데, 이건 Cold Start에서 발생한다. 실패 상태 직후에 새로운 착신이 오면 수락을 처리할 수 있어야 한다.
7-5. TTS가 중간에 잘리는 문제
통화 연결 실패 시 “상대방이 통화중입니다” 같은 TTS 음성 안내를 재생한다. 그런데 실패 핸들러에서 dismissAllCalls()를 호출하면, Android에서 CallKit이 오디오 세션 자체를 종료해버려서 TTS가 중간에 뚝 끊겼다.

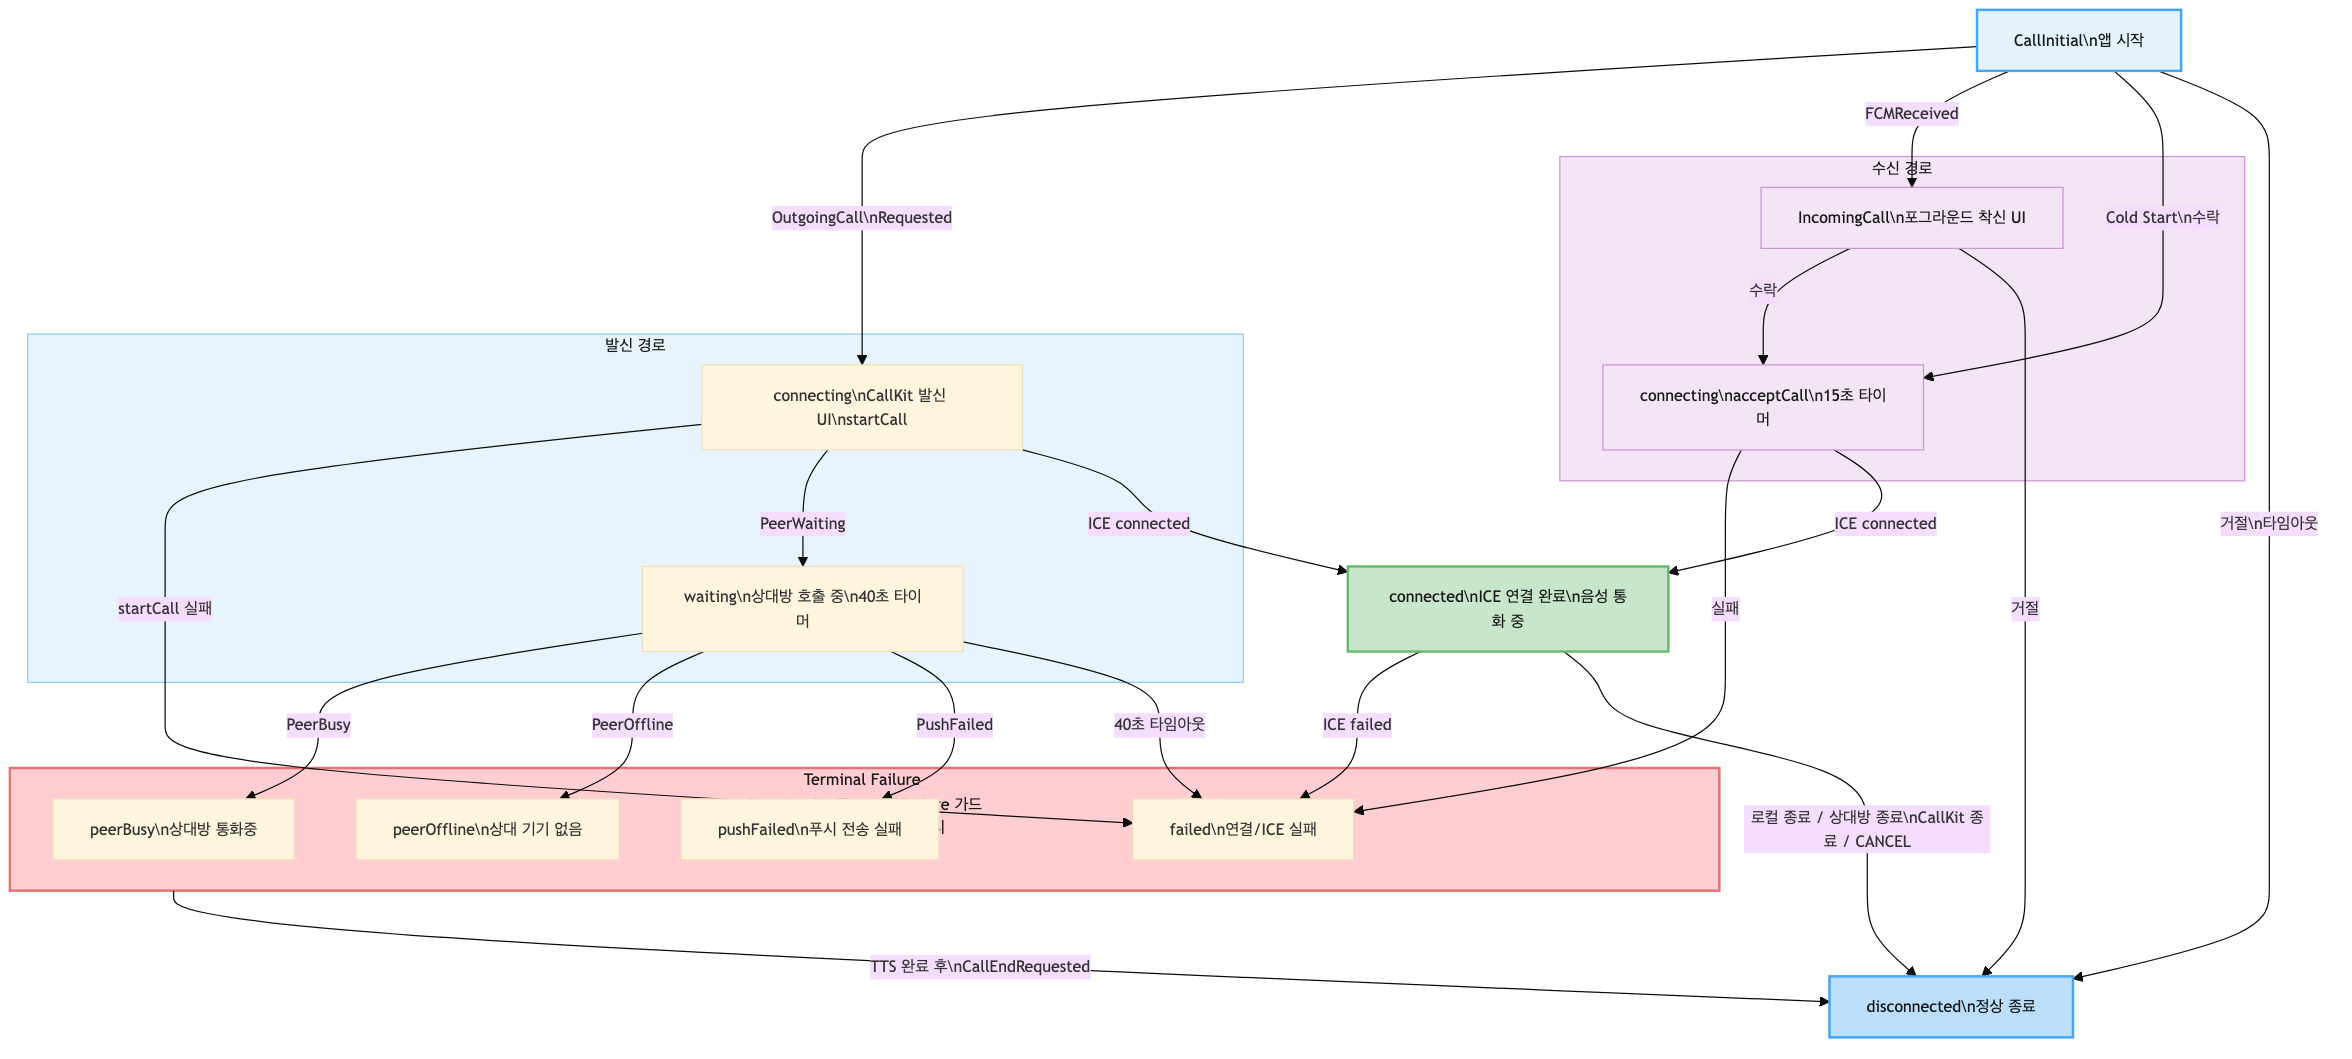
위 다이어그램에서 “Terminal Failure States” 영역을 보면, 실패 핸들러에서 dismissAllCalls()를 호출하지 않고, TTS 완료 후 CallEndRequested 이벤트를 dispatch하여 정리하는 흐름을 볼 수 있다. TTS가 끝나고 나서야 오디오 세션이 정리된다.
그리고 한 가지 더, Android TTS 엔진은 시작 직후 오디오 포커스를 획득하는 데 시간이 필요하다. speak() 호출 직후에 바로 음성이 나오는 게 아니라, 첫 300ms 정도가 무음 처리된다. 그래서 “상대방이”가 “대방이”로 들렸다. speak() 전에 300ms 딜레이를 넣어서 해결했다.
7-6. sendCallEnd: 소켓이 연결됐는데 서버가 아직 안 받는다
거절이나 부재 시 상대방에게 통화 종료를 알려야 한다. 이때 임시 소켓을 만들어서 call-ended 이벤트를 전송하고 바로 끊는다. 하지만 여기서도 3장의 “connect ≠ 서버 준비”와 동일한 문제가 발생했다.
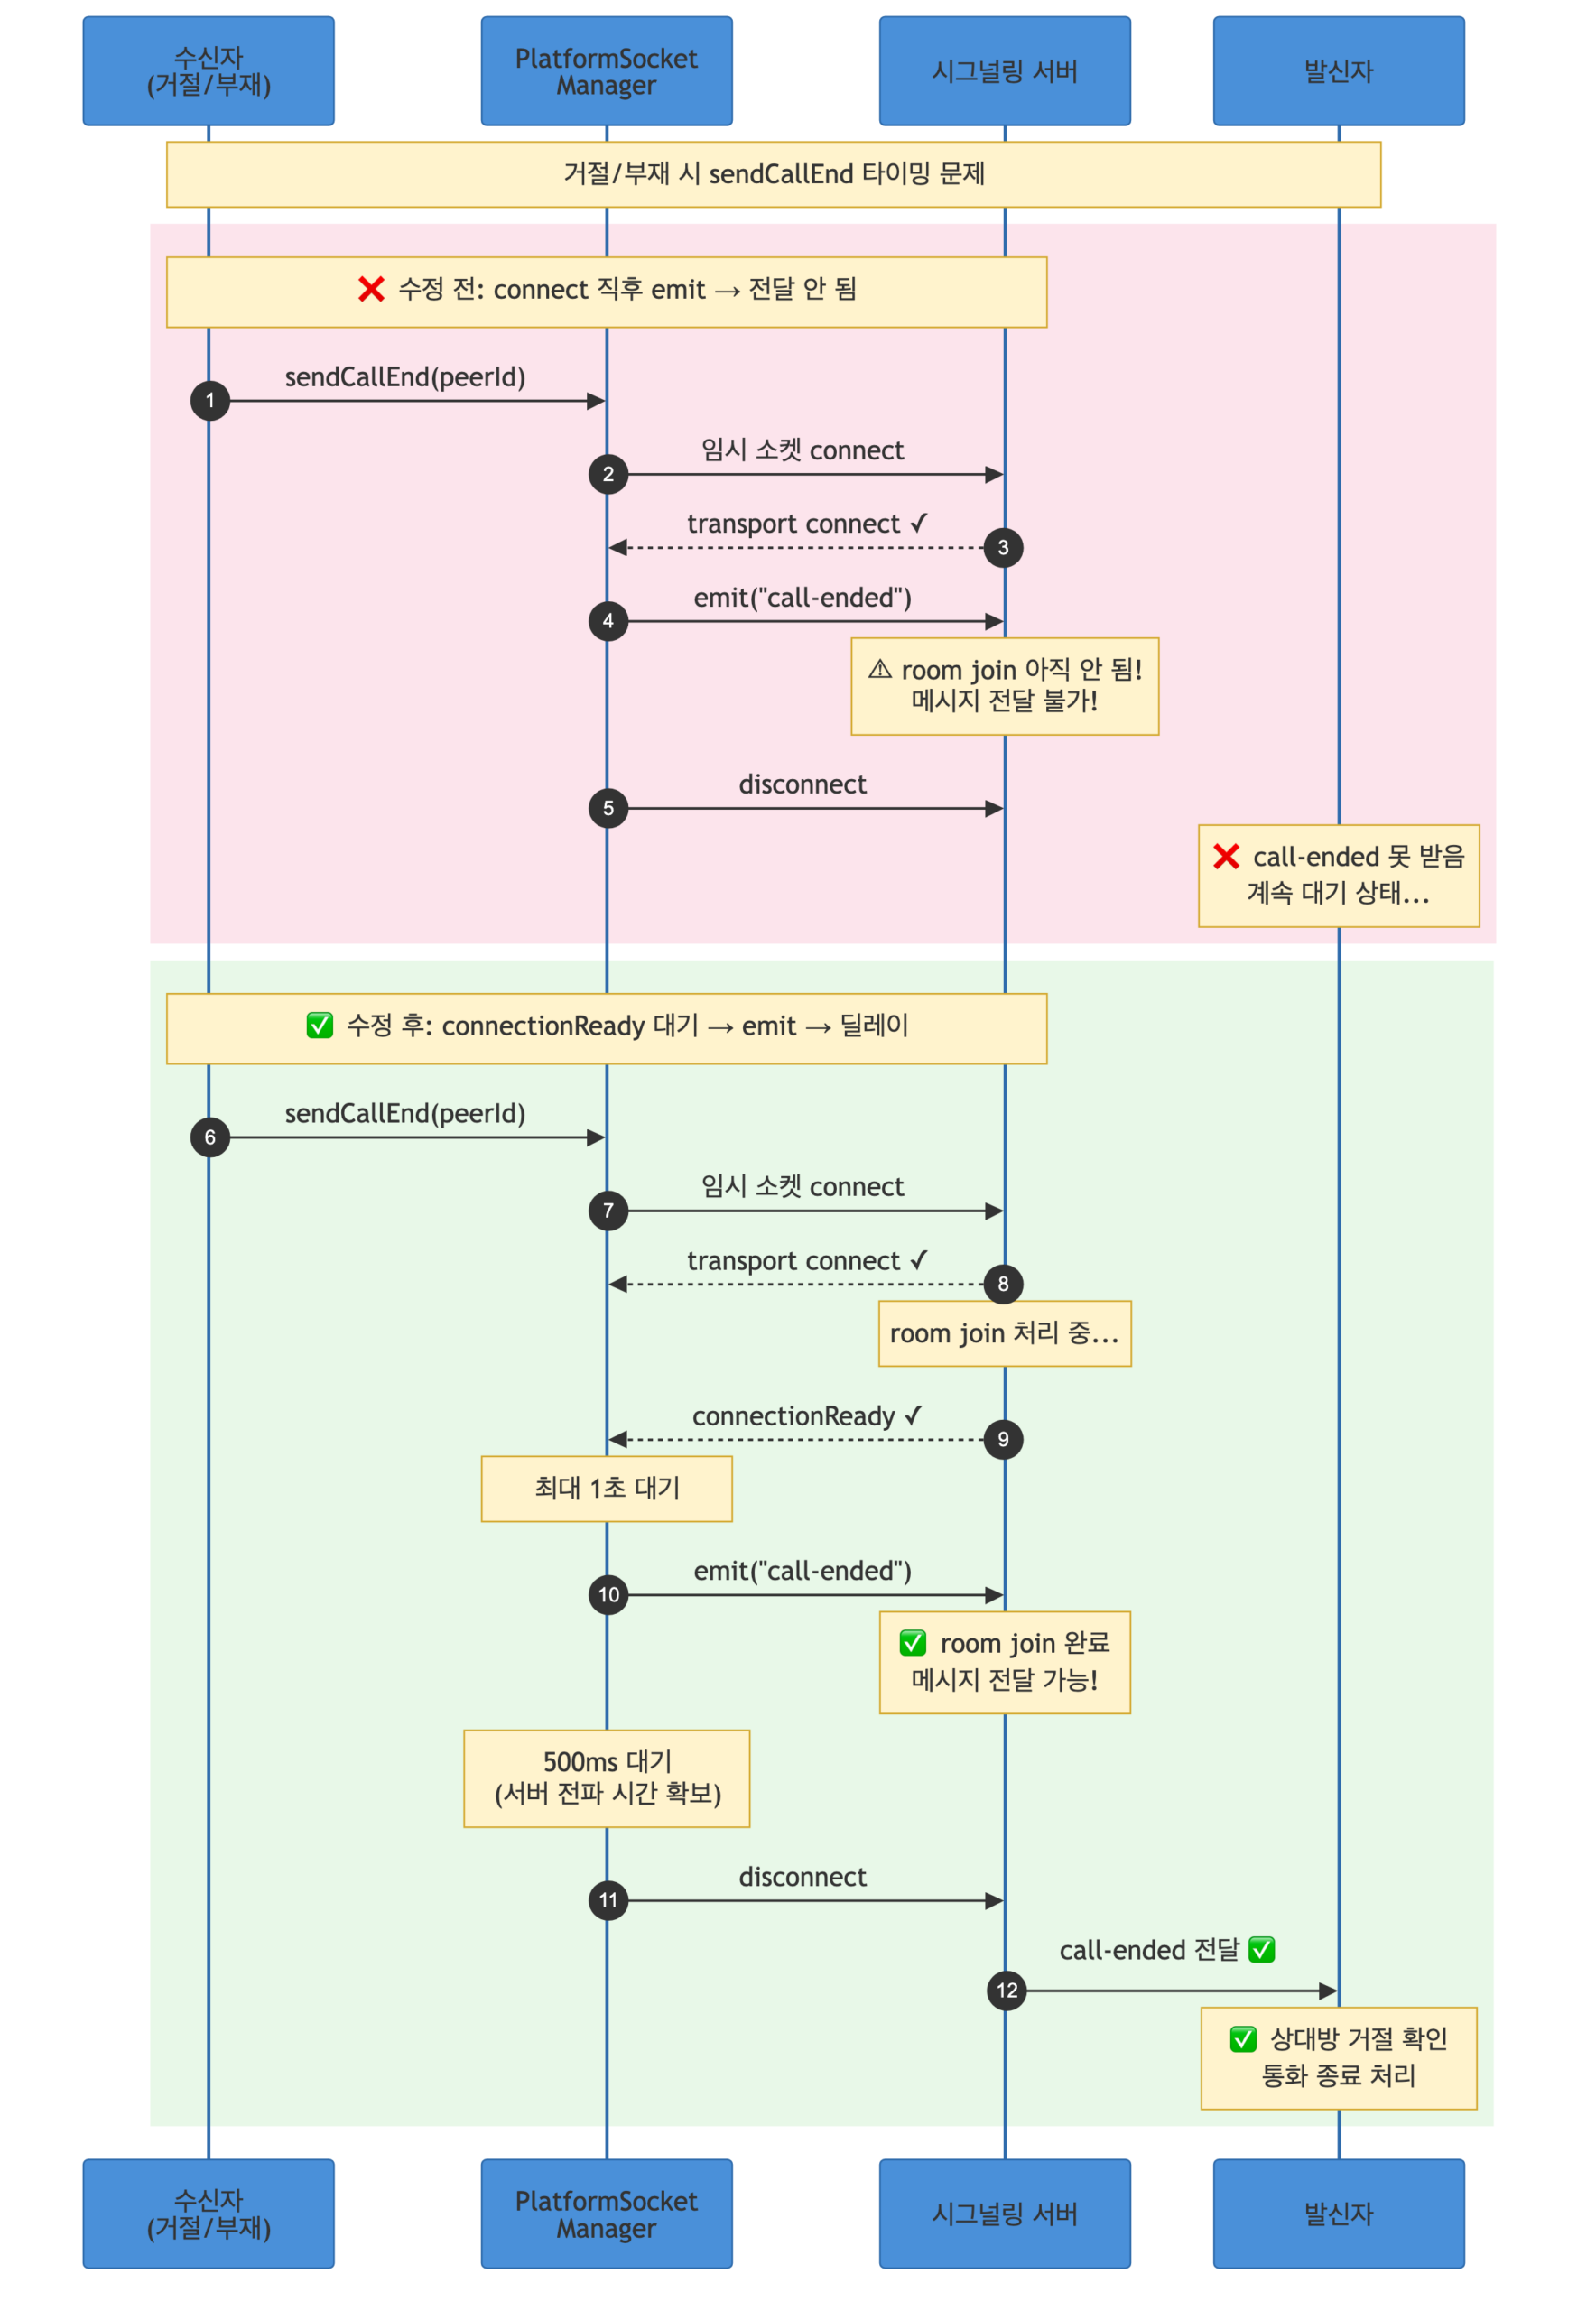
위 다이어그램처럼, connectionReady 이벤트를 최대 1초 기다린 후 emit하고, emit 후에도 500ms를 기다려서 서버가 메시지를 전파할 시간을 준다.
8장. BLoC의 상태 전이 — 13개 이벤트의 오케스트라
CallStateBloc은 13개의 이벤트를 처리한다. 각 이벤트가 어떤 상태 전이를 일으키는지, 그리고 어떤 가드 조건이 있는지를 정리하면:
생성자에서 9개의 스트림을 구독하여, 네이티브와 서버에서 오는 이벤트를 실시간으로 BLoC 이벤트로 변환한다:
class CallStateBloc extends Bloc<CallEvent, CallState> {
  CallStateBloc({
    required CallUsecase callUsecase,
    required AuthUsecase authUsecase,
    required IncomingEventSource incomingEventSource,
    required CallAlertService alertService,
  }) : /* 필드 초기화 */ super(CallInitial()) {
    // 13개 이벤트 핸들러 등록
    on<UserInfoSet>(_onUserInfoSet);
    on<OutgoingCallRequested>(_onOutgoingCallRequested);
    on<FCMCallReceived>(_onFCMCallReceived);
    on<CallKitEventReceived>(_onCallKitEventReceived);
    on<CallCancelEvent>(_onCallCancelReceived);
    on<PeerWaitingReceived>(_onPeerWaiting);
    on<PeerBusyReceived>(_onPeerBusy);
    on<PeerOfflineReceived>(_onPeerOffline);
    on<PushFailedReceived>(_onPushFailed);
    on<RemoteCallEnded>(_onRemoteCallEnded);
    on<CallEndRequested>(_onCallEndRequested);
    on<IceStateChanged>(_onIceStateChanged);
    on<WaitingTimeoutReached>(_onWaitingTimeout);

    // ⭐ 9개 스트림 구독 (네이티브/서버 이벤트 → BLoC 이벤트)
    _subscribePlatformEvents();
  }

  // ...

  void _subscribePlatformEvents() {
    // FCM 포그라운드 착신
    _fcmSub = _incomingEventSource.onForegroundCallReceived.listen((info) {
      add(FCMCallReceived(
        callerName: info.callerName,
        callerOrg: info.callerOrg,
        callerId: info.callerId,
      ));
    });

    // CALL_CANCEL
    _cancelSub = _incomingEventSource.onCallCancelReceived.listen((_) {
      add(CallCancelEvent());
    });

    // CallKit 이벤트 (수락/거절/종료)
    _callKitSub = _incomingEventSource.onCallKitEvent.listen((event) {
      add(CallKitEventReceived(callKitEvent: event));
    });

    // 서버 이벤트 6종
    _peerWaitingSub = _callUsecase.onPeerWaiting().listen((_) {
      add(PeerWaitingReceived());
    });
    _peerBusySub = _callUsecase.onPeerBusy().listen((_) {
      add(PeerBusyReceived());
    });
    _peerOfflineSub = _callUsecase.onPeerOffline().listen((_) {
      add(PeerOfflineReceived());
    });
    _pushFailedSub = _callUsecase.onPushFailed().listen((_) {
      add(PushFailedReceived());
    });
    _callEndedSub = _callUsecase.onCallEnded().listen((_) {
      add(RemoteCallEnded());
    });
    _iceSub = _callUsecase.onIceConnectionState().listen((status) {
      add(IceStateChanged(iceStatus: status));
    });
  }
}
8-1. 발신 흐름의 Cold Start 분기
발신에서도 Cold Start가 발생할 수 있다. 딥링크를 통해 앱이 Cold Start되면서 바로 발신을 시도하는 경우, _me(현재 사용자 정보)가 아직 설정되지 않았을 수 있다:
Future<void> _onOutgoingCallRequested(
  OutgoingCallRequested event,
  Emitter<CallState> emit,
) async {
  if (isCallActive) return;  // 이미 통화 중이면 무시

  _currentPeerId = event.peerId;
  _currentPeerName = event.peerName;

  emit(CallConnectionState(status: CallStatus.connecting));

  // CallKit 발신 UI 표시
  await _alertService.showOutgoingCall(
    uuid: event.peerId,
    handle: event.peerName,
    displayName: event.peerName.isNotEmpty ? event.peerName : event.peerId,
  );

  // ⭐ Cold Start 분기: 사용자 정보가 없으면 서버에서 조회
  if (_me.id.isEmpty) {
    final meResult = await _authUsecase.fetchCurrentUser();
    if (!meResult.isSuccess || meResult.data == null) {
      // 사용자 조회 실패 → unknownUser 상태
      emit(CallConnectionState(status: CallStatus.unknownUser));
      return;
    }
    _me = meResult.data!;
  }

  // WebRTC 연결 시작
  final result = await _callUsecase.startCall(me: _me, peerId: event.peerId);
  if (!result.isSuccess) {
    emit(CallConnectionState(status: CallStatus.failed));
  }
}
8-2. 타이머: 40초 대기 + 15초 연결
두 개의 타이머가 비정상 상황을 방지한다:
- 40초 대기 타이머:
peerWaiting이벤트를 받으면 시작. 40초 안에 상대방이 응답하지 않으면WaitingTimeoutReached이벤트를 self-dispatch하여 통화를 종료한다. - 15초 연결 타이머: 수신자가 수락했을 때 시작. 15초 안에 ICE
connected가 되지 않으면CallEndRequested를 self-dispatch한다.
// 상대방 호출 중 → 40초 대기 타이머 시작
Future<void> _onPeerWaiting(
  PeerWaitingReceived event,
  Emitter<CallState> emit,
) async {
  emit(CallConnectionState(status: CallStatus.waiting));
  _waitTimer?.cancel();
  _waitTimer = Timer(const Duration(seconds: 40), () {
    add(WaitingTimeoutReached());
  });
}

// 수락 시 → 15초 연결 타이머 시작
// (CallKit accepted 핸들러 내부)
_connectTimer?.cancel();
_connectTimer = Timer(const Duration(seconds: 15), () {
  add(CallEndRequested());  // 연결 실패로 처리
});
타이머 이벤트를 Timer 콜백에서 직접 emit하지 않고 add()로 BLoC 이벤트를 dispatch하는 이유는, BLoC의 이벤트 처리가 순차적으로 보장되기 때문이다. Timer 콜백과 다른 이벤트 핸들러가 동시에 상태를 변경하는 레이스 컨디션을 방지한다.
에필로그. 돌아보며
처음에 “WebRTC 붙이면 끝”이라고 생각했던 기능이, 결국 네이티브 3개 파일, Flutter 15개 파일, 그리고 서버 시그널링 프로토콜의 합작이 되었다.
이 과정에서 얻은 가장 중요한 교훈들
1. “네이티브 퍼스트”가 VoIP의 정답이다. iOS PushKit과 CallKit은 네이티브에서만 제대로 다룰 수 있다. Flutter에서 모든 걸 처리하려고 하면 Cold Start에서 반드시 깨진다. 네이티브가 통화의 생명주기를 관리하고, Flutter는 미디어와 UI만 담당하는 구조가 가장 안정적이었다.
2. Socket.IO connect ≠ 서버 준비 완료. 이 차이를 모르면 90%의 시그널이 유실된다.
transport 레벨의 연결 수립과, 서버 애플리케이션이 소켓을 room에 join시키는 것은 비동기적으로 일어난다. 서버가 명시적으로 보내는 connectionReady 이벤트를 반드시 기다려야 한다. sendCallEnd에서도 동일한 패턴이 필요했다.
3. SharedPreferences에는 reload()라는 메서드가 있다. 이걸 아는 사람이 많지 않다.
Flutter의 SharedPreferences는 첫 호출 시 데이터를 메모리에 캐시한다. 네이티브 코드에서 같은 파일에 직접 쓴 값은 이 캐시에 반영되지 않는다. reload()를 호출하지 않으면 네이티브에서 쓴 데이터를 읽을 수 없다. Cold Start 복구에서 이 한 줄이 전부를 결정한다.
4. Android의 endAllCalls()는 오디오 세션을 죽인다.
flutter_callkit_incoming의 endAllCalls()는 Android에서 오디오 포커스를 해제한다. TTS나 효과음이 재생 중이라면, 재생이 끝난 후에 호출해야 한다. 그리고 Android TTS 엔진은 시작 후 약 300ms의 오디오 포커스 획득 시간이 필요하다. 이 딜레이를 주지 않으면 첫 음절이 잘린다.
5. 레이스 컨디션은 “가드 조건”으로 방어한다.
isCallActive, _hasTerminalFailure, 현재 peer ID 비교 — 이 세 가지 가드가 대부분의 타이밍 문제를 막아준다. 이벤트가 “올바른 시점에 올바른 상태에서” 처리되도록 보장하는 것이 핵심이다.
6. broadcast StreamController는 구독자 없으면 이벤트를 삼킨다. Cold Start에서 가장 근본적인 문제다. 해결책은 세 겹이다: (1) 이벤트 캐싱 + Future.microtask 재생, (2) activeCalls() API 폴백, (3) SharedPreferences 폴백. 한 겹만으로는 모든 플랫폼과 시나리오를 커버할 수 없었다.
VoIP 기능은 “전화를 걸고 받는다”는 단순한 사용자 경험 뒤에, 플랫폼의 가장 깊은 곳까지 내려가야 하는 복잡한 기술 스택이 숨어있다. 하지만 그래서 재미있었다.